1. Infrastructure as Code using GitHub Actions
In this section we describe how to run all the Infrastructure as Code using GitHub actions, Terraform CLI, AWS.

The overall workflow is represented in the below workflow diagram. A user pushes the code to feature branch and submits a pull request. When the pull request is submitted the GitHub actions pipeline gets triggered and runs terraform plan.

1.1. Setting up the GitHub repository
 Setup forked repository
If you don’t have an alternate organization into which you can fork the openidl-org/openidl-aais-gitops repo, then create that now
We are using the develop-nginx-v1 branch here. If you don’t have one called that in your fork, then create that branch now.
Fetch the upstream for develop into your repository.
NOTE: The github repository information
Since most of the time we’ll be forking the repo, it is necessary to activate terraform on the actions page.
1.1.1. Activate GitHub Actions
To activate GitHub Actions for Terraform. Go to GitHub Actions sections and look for Terraform and click on setup this workflow. The reference screenshot below.

Then commit the file terraform.yml to enable Actions. Note: This is a dummy file, and it can be removed once the entire pipeline is setup and working with branches.

The primary GitHub repository used for infrastructure as code is mentioned below.
GitHub repository: https://github.com/openidl-org/openidl-aais-gitops.git
1.1.2. Basic configuration required for GitHub repository
The appropriate number of branches and its naming are vital for the overall GitHub actions pipeline. Hence setup the repository with the following branches and its names according to required nodes to setup. Only those branches you will use are needed. So, if you are setting up a carrier node, only use those branches.
Node Type |
Environment |
Branch Name |
|---|---|---|
AAIS node |
Dev |
aais_dev |
AAIS node |
Test |
aais_test |
AAIS node |
Prod |
aais_prod |
Carrier node |
Dev |
carrier_dev |
Carrier node |
Test |
carrier_test |
Carrier node |
Prod |
carrier_prod |
Analytics node |
Dev |
analytics_dev |
Analytics node |
Test |
analytics_test |
Analytics node |
Prod |
analytics_prod |
- Note:
The naming format for any feature branch should be <base_branch_name>* Example: feature branch for carrier node in test environment may be: carrier_test_feature
1.1.3. Best practices to consider in setting up GitHub repository
Follow best practices in github
The below are best practices recommended in setting up a GitHub repository and for more details refer to GitHub documentation. However, these are only optional for enabling the pipeline.
Enable appropriate branch protection rules to manage who can push/pull to a branch
Enable required status checks, either strict or loose to have controlled updates to the branch
Configure how to merge based on requirements (Option A: Allow merge commits, Option B: Allow squash merging, Option C: Allow rebase merging)
Disable auto merge
Disable auto delete of head branch
Enable who can have access to repository
Enable branch protection by setting up
require pull requests review before merging,
require conversion resolution before merging
Protect who can push to branch directly
Setup notifications related to branch updates/changes
Setup artifact and log retention as per needs
Configure necessary secrets according to requirements at Organization, Environment or Repository level.
Setup Runner configuration - Allow select actions especially those created by GitHub and verified marketplace actions as below. (GitHub Actions only)

1.1.4. How to setup GitHub Environments
This is a mandatory step to perform for the pipeline to function. The pipeline uses Environments in GitHub to function using specific branches and its related secrets configured under the GitHub Environment. Hence, to setup the GitHub environment follow the below steps.
Login to GitHub and get into necessary GitHub repository
Go to settings and click on Environments
For each node type and its relevant environment (dev | test | prod) setup the GitHub environments
Click on New environment
Enter the environment name, prefer name of the branch it will be mapped to.
Setup necessary environment protection rules like Required reviewers, wait timer.

Setup the branch pattern to which this environment will be applied to. Example to setup the environment for aais_dev and its relevant feature branch set the selected deployment branch pattern as aais_dev*. This enables pull | push request to trigger GitHub actions pipeline against this specific environment.

- NOTE:
Later in this document, we will set up sensitive data. The secrets relevant and specific to this environment will be added under environment secrets. Hence environment secrets can be skipped at this moment.
1.2. Prepare AWS environment
We must set up a few things in aws before we can start using the infrastructure as code to provision our node.
 Note the aws account number
1.2.1. Setup IAM Role
Setup terraform IAM Role
Login to AWS console using either a root account or IAM user with administrative rights
Go to IAM and go to roles under access management and click on create role
Select type of trusted entity as “AWS account”
Keep the default for the account.
Choose “Require external ID” and enter “terraform”. Then click “next”

Then click on create policy, select json and update the policy content with below policy to limit only necessary permissions for the IAM role to be used by terraform to manage AWS resources.
{
    "Version": "2012-10-17",
    "Statement": [
        {
            "Sid": "AllowServices",
            "Effect": "Allow",
            "Action": [
                "iam:*",
                "ec2:*",
                "s3:*",
                "cloudtrail:*",
                "cloudwatch:*",
                "logs:*",
                "ses:*",
                "cognito-idp:*",
                "eks:*",
                "kms:*",
                "dynamodb:*",
                "acm:*",
                "autoscaling:*",
                "elasticloadbalancing:*",
                "ebs:*",
                "route53:*",
                "route53domains:*",
                "sts:*",
                "secretsmanager:*",
                "cloudformation:ListStacks",
                "sns:*",
                "application-autoscaling:*",
                "lambda:*"
            ],
            "Resource": "*"
        }
    ]
}
Add necessary meaningful tags which are arbitrary for the policy
Example:
Owner = “”
Used_by = “terraform”
Application = “openidl”
Enter a name for the IAM policy, ex: tf_admin_policy and click on create policy to finish

Once the policy is created, go back to roles screen, and create the role again click refresh and select the named policy created in previous step and hit the refresh button.
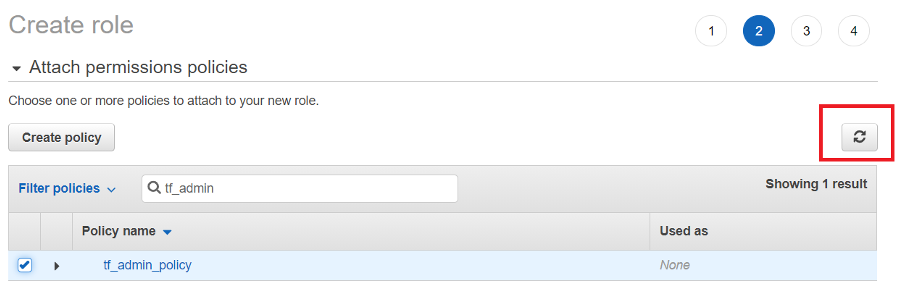
Add the necessary arbitrary tags to the IAM role this time and click Review
Enter role name, a description and ensure the policy is assigned as per below screen shot and click on create role to finish setting up IAM role with necessary policy required to manage AWS
- Note down the ARN of the IAM role created as it is required for next steps as well as in terraform configuration.

1.2.2. Setup IAM User with inline policy
Setup IAM terraform user
Within IAM in AWS console go to users in access management and click on Add users
Enter a username and select AWS access type as “Programmatic access” and click next.

Add user to specific group if applicable, otherwise key in tags and finish creating user
Note: Do not attach any IAM policy at this moment.
Create the user
Note the access key id and secret key
Then get back to users and open the created user, go to permissions and click on Add inline policy, click on json

Modify the below policy template by adding ARN of the IAM role created in previous step and the external id value set in previous step and click review policy “terraform” is the external id
{
    "Version": "2012-10-17",
    "Statement": [
        {
            "Action": [
                    "sts:AssumeRole",
                    "sts:TagSession"
            ],
            "Resource": "<AWS_IAM_ROLE_ARN>",
            "Effect": "Allow",
            "Condition": {
            "StringEquals": {
                    "sts:ExternalId": "<AWS_EXTERNAL_ID>"
                }
            }
        }
    ]
}
Finally name the inline policy and finish creating it. Use “tf_user_policy”.
- Note down the IAM user access key and secret key

- Note the arn for the user
1.2.3. Update IAM Role with Trust Policy
Update role trust policy
Finally, time to update the trust policy for the IAM role created in the previous step. So, within AWS console under IAM go to roles in access management, select the role created in previous step.
Go to trust relationships and click on Edit trust relationship
Now update the policy document using the below template with update on IAM user ARN and finish update trust policy
{
    "Version": "2012-10-17",
    "Statement": [
        {
        "Effect": "Allow",
        "Principal": {
            "AWS": "<IAM_USER_ARN>"
        },
        "Action": [
            "sts:AssumeRole",
            "sts:TagSession"
        ],
        "Condition": {
            "StringEquals": {
            "sts:ExternalId": "<AWS_EXTERNAL_ID>"
            }
        }
        }
    ]
}
External ID is from the first step of IAM. “terraform”
Now we have completed the following steps
Created IAM role (ARN to be noted)
Assigned permission policy to manage AWS resources
Created IAM user that issues access key and secret key as well (ARN, access key and secret key to be noted)
Created and assigned IAM assume policy to IAM user to assume the IAM role
Updated trust policy in IAM role to allow IAM user to assume the role
This IAM user credentials and IAM role will be used in managing AWS resources via Terraform IaC.
1.3. Setup terraform backend and S3 bucket (GitActions only)
In this section, the terraform backend resources required to manage terraform state files and s3 bucket to store | manage terraform input files would be configured.
A S3 bucket – to manage terraform state files
A S3 bucket – to manage terraform input files
A DynamoDB table – to manage terraform state lock for AWS resources provisioning pipeline
A DynamoDB table – to manage terraforms state lock for Kubernetes resources provisioning pipeline.
These resources may be provisioned automated | manual. It is recommended to use automated approach as it is quick and simple.
1.3.1. Option1: Using terraform automation
Identify a system on which terraform CLI can be performed (checkout develop branch)
If you don’t have the terraform CLI, then install it now.
Download and setup terraform CLI. refer to url: https://www.terraform.io/downloads.html (Install version 1.0.0)
Setup a local directory and clone the forked repository. It was forked from: (https://github.com/openidl-org/openidl-aais-gitops.git)
This is not the final terraform flow. Just a temporary place to bootstrap terraform, that will be thrown away later.

Go to aws/tf_backend_setup directory

Refer to terraform.tfvars.template and create terraform.tfvars input file. You will be preparing the following information in that input file.
Terraform Variables¶ Required Input
Description
Sensitive
HCL
Template Value
org_name
Four character name unique to the network
no
no
carr
aws_env
Environment. Valid values are dev | test | prod
no
no
dev
aws_account_id
AWS account number
no
no
12 digit number
aws_access_key
IAM user access key - from the terraform user
yes
no
aws_secret_key
IAM user secret key - from the terraform user
yes
no
aws_user_arn
IAM user ARN - from the terraform user
no
no
arn:aws:iam::{{ account number }}:user/terraform_user
aws_role_arn
IAM role ARN - from the terraform user
no
no
arn:aws:iam::{{ account number }}:role/tf_automation
aws_region
AWS region to setup the resources
no
no
us-east-1
aws_external_id
AWS external id used while setting up IAM user and IAM role
no
no
terraform
tf_backend_s3_bucket
Globally unique bucket name for terraform state files - suggest something like <node_type>-<node_env>-<org_name>-backend-state eg: aais-dev-aais-backend-state
no
no
tf_inputs_s3_bucket
Globally unique bucket name for terraform input files - suggest something like <node_type>-<node_env>-<org_name>-inputs eg: aais-dev-aais-inputs
no
no
tf_backend_dynamodb_table_aws_resources
DynamoDB table to manage terraform state locking in AWS resources pipeline - suggest <node_type>-<node_env>-<org_name>-aws-resources
no
no
tf_backend_dynamodb_table_k8s_resources
DynamoDB table to manage terraform state locking in Kubernetes resources pipeline - suggest <node_type>-<node_env>-<org_name>-k8s-resources
no
no
create_kms_keys
Choose whether to create KMS keys/use existing keys
no
no
true
s3_kms_key_arn
KMS key ARN to encrypt objects in S3 bucket when create_kms_key is false
no
no
KMS-KEY-ARN
dynamodb_kms_key_arn
KMS key ARN to encrypt dynamodb tables when create_kms_key is false
no
no
KMS-KEY-ARN
custom_tags
Additional tags to include
no
yes
{ custom_tag1 = “custom_value1”
custom_tag2 = “custom_value2”}
Upon input file is prepared with necessary details, perform terraform initialization from the tf_backend_setup directory as below using command #> terraform init

Now execute terraform plan and review the changes this terraform would perform in the AWS environment. #> terraform plan –var-file=terraform.tfvars


Upon reviewing the terraform plan outcome and ensuring the action it would take, run terraform apply.
#> terraform apply –var-file=terraform.tfvars

Review results of terraform apply and verify the resources created in AWS console to ensure they are all ready for GitHub actions pipeline.
Go to S3 in AWS console and validate S3 buckets are created
Go to DynamoDB in AWS console and validate DynamoDB table is created
- Finally note down the name of the resources provisioned and its ARN
as they would be used further in setting up the pipeline.
NOTES: Also, backup the terraform state file part of this terraform backend setup execution as they may be required in future to manage these resources using automation. It is recommended to upload in S3 bucket to a separate folder
1.3.2. Option2: Using AWS console (Manual)
1.3.2.1. Step1: Setup KMS Keys
Create two KMS keys following below steps.
One for S3 Buckets
One for DynamoDB tables
First step is to setup AWS KMS key that is required to encrypt data in S3 bucket. Hence in AWS console go to KMS service, select Customer-managed keys and click on create key and select Key type as Symmetric and click Advanced options

Select Key material origin as KMS and regionality as Single region key click next

Give key alias name, a description and add meaningful tags.
Then select IAM role that was created in previous step as key administrators and choose to allow key administrator to delete this key.
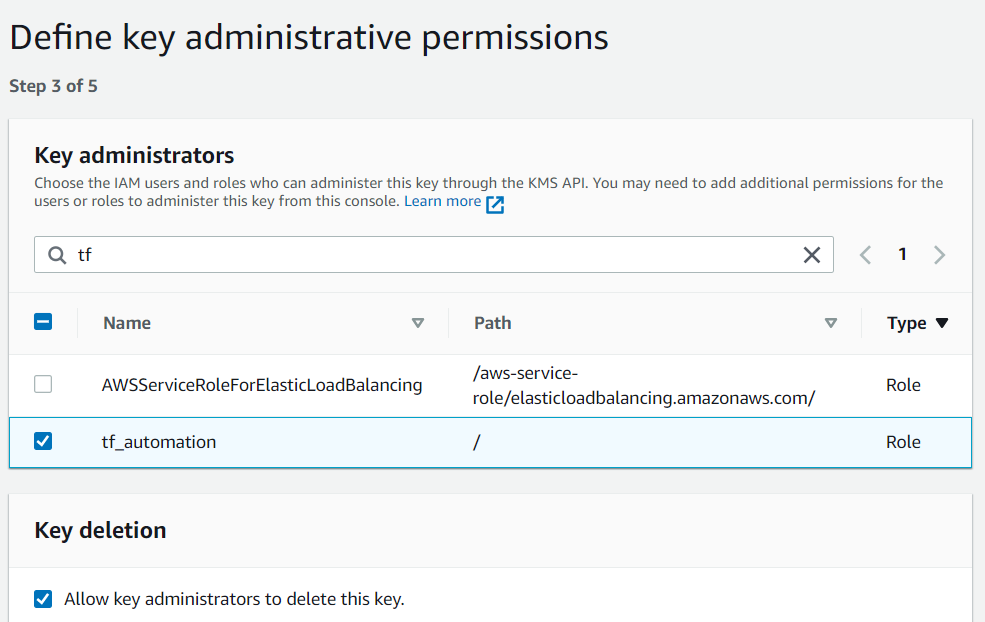
5. Again select IAM role setup in previous step for key usage permissions and finish creating KMS key.

1.3.2.2. Step2: Setting up S3 bucket for AWS resources & K8s resources
Setup two S3 bucket following below procedure. One would be used for AWS resources provisioning and one with Kubernetes resource provisioning.
In AWS console, go to S3 service under buckets click on create bucket
Give globally a unique name to the bucket and select the specific region to host the bucket

Block public access to the bucket as below

Enable bucket versioning and set meaningful tags as necessary

Enable server-side encryption, choose AWS Key Management Service Key (SSE-KMS)
Then from AWS KMS Key, select Choose from your AWS KMS keys and select AWS KMS key that was created in previous step
Enable Bucket Key

Finish creating the bucket. Then go to the created bucket and open.
Go to permissions and click edit under bucket policy
Update the below bucket policy template and add it.
{
    "Version": "2012-10-17",
    "Id": "tf_bucketpolicy",
    "Statement": [
        {
            "Sid": "allow iam role",
            "Effect": "Allow",
            "Principal": {
                "AWS": "<AWS_ROLE_ARN>"
            },
            "Action": [
                "s3:GetObject",
                "s3:PutObject"
            ],
            "Resource": "arn:aws:s3:::<Bucket_Name>/*"
        },
        {
            "Sid": "Stmt1625783799751",
            "Effect": "Allow",
            "Principal": {
                "AWS": "<AWS_ROLE_ARN>"
            },
            "Action": "s3:ListBucket",
            "Resource": "arn:aws:s3:::<Bucket_Name>"
        }
    ]
}
Note: Bucket name is name of the bucket that this policy is getting created, role ARN is the IAM role that was created in previous step.
1.3.2.3. Step3: Setting up S3 bucket for Terraform Input file
Follow same steps of in creating S3 bucket in previous step to provision another S3 bucket for terraform input files.
1.3.2.4. Step4: Setting up DynamoDB table for AWS resources pipeline & K8s resources pipeline
Create two DyanmoDB tables for the following.
For AWS resources pipeline
For K8s resources pipeline
In AWS console, go to DynamoDB service and click create table. Give a name to the table and set Primary Key as “LockID”

Uncheck use default settings if required and define custom configuration otherwise use defaults.

If chosen custom, define required read/write capacity

Define required read and write capacity units

Choose required encryption option for data at rest. Instead of DEFAULT choose KMS-Customer Managed CMK and select the KMS key created previously for DynamoDB.
1.4. Setup email identity and move SES out of sandbox
Cognito user pool allows users to self-sign in (self-register) using their email id. Hence during user self-sign in process, Cognito sends email to the user email address for verification.
These emails to users can be sent using Cognito default service or using AWS SES service.
Limitations:
Cognito default allows only 50 emails per day only
Based on requirement, the option of either default email service (COGNITO_DEFAULT) or SES service (DEVELOPER) shall be chosen
1.4.1. Option1: COGNITO_DEFAULT
1. In case, Cognito default is preferred, there are no actions in adding an email address and verifying it or moving SES service out of sandbox for production used.
2. When Cognito default is chosen, set email_sending_account = “COGNITO_DEFAULT” in input file (secrets).
3. Set the below inputs as empty in GitHub secrets as they are NA. (These secrets must be set empty and cannot be ignored to set as empty, otherwise GitHub actions pipeline will fail).
ses_email_identity = “”
userpool_email_source_arn = “”
1.4.2. Option2: AWS SES Service (DEVELOPER)
1. Note that Cognito supports SES service only in the following region though SES is available in most of the AWS regions. Hence for Cognito to work along with SES choose either one of the regions to configure for below steps.
Cognito supported SES regions:
us-west-1
us-west-2
us-east-1
2. In AWS console, choose one of the regions mentioned above, go to SES service select email addresses
Login to AWS console, go to simple email service in one of the regions and add the email address and click on verify a new email address

3. Enter an email address that would be used as an identity by Cognito in sending emails to users during self-sign up.

4. A verification email would be triggered to the email address that was added. Please login to the email account and complete email id verification.
5. Then note down the ARN of the email address and the email address
itself that was verified in SES.

6. Further go to email addresses and click on the email id that is added, then select Identity Policies and click on Create policy and select Custom Policy.

7. Edit the below policy and replace account number and email-id with the relevant values and add this policy statement to finish creating identity policy. This allows Cognito to use SES service to trigger emails upon user self-sign in to verify user identity.
{ “Version”: “2008-10-17”, “Statement”: [ { “Sid”: “stmnt1234567891234”, “Effect”: “Allow”, “Principal”: { “Service”: “cognito-idp.amazonaws.com” }, “Action”: [ “ses:SendEmail”, “ses:SendRawEmail” ], “Resource”: “arn:aws:ses:us-east-1:<aws_account_number>:identity/<emailid>” } ] } |

8. Finally follow the below link to move SES service out of sandbox for production use.
https://docs.aws.amazon.com/ses/latest/DeveloperGuide/request-production-access.html
1.5. Setup sensitive data as secrets in GitHub (GitHub Actions only)
All the sensitive data are required to be configured as secrets in GitHub. There are multiple ways to configure secrets
Environment secrets
Repository secrets
Organization secrets.
We would be configuring all the sensitive data as environment secrets which will allow GitHub actions to use them in the pipeline. Follow the below steps.
Login to GitHub and select the relevant repository
Go to settings and click on Environment
3. Now select the environment referring to the table to which secrets are to be entered. Note that all these environments mentioned in below table are setup part of preparing GitHub repository in the previous section.
Node Type |
Environment |
Branch Name |
Environment Name |
|---|---|---|---|
aais node |
dev |
aais_dev |
aais_dev |
aais node |
test |
aais_test |
aais_test |
aais node |
prod |
aais_prod |
aais_prod |
carrier node |
dev |
carrier_dev |
carrier_dev |
carrier node |
test |
carrier_test |
carrier_test |
carrier node |
prod |
carrier_prod |
carrier_prod |
analytics node |
dev |
analytics_dev |
analytics_dev |
analytics node |
test |
analytics_test |
analytics_test |
analytics node |
prod |
analytics_prod |
analytics_prod |
1.5.1. Add the following sensitive data as environment secrets. Ensure that the secrets are added according to the node_type, environment_type and branch.
1.5.2. For the SSH keys, create one key atleast and use the same for all SSH keys (used for bastion and EKS worker nodes).
Use ssh-keygen command to prepare required SSH keys and use the public key in the environment secret for SSH key variable.
S no |
Sensitive data |
Data Type |
Example input format during secret configuration |
Description |
|---|---|---|---|---|
1 |
aws_account_number |
string |
<account_number> |
AWS account in which the nodes will be deployed |
2 |
aws_access_key |
string |
<access_key> |
IAM user access key - for terraform user |
3 |
aws_secret_key |
string |
<secret_key> |
IAM user secret key - for terraform user |
4 |
aws_user_arn |
string |
arn:aws:iam::<acc_number>:user/<user_name> |
IAM user ARN - for terraform user |
5 |
aws_role_arn |
string |
arn:aws:iam::<acc_number>:role/<role_name> |
IAM role ARN - for terraform user |
6 |
aws_external_id |
string |
<external_id> (example: terraform) |
external id that was setup during IAM user and IAM role setup |
7 |
aws_region |
string |
<aws_region> (example: us-east-1) |
AWS region in which the nodes to deploy. Use ssh-keygen. Take defaults. Don’t overwrite your own, so you may want to just put id_rsa. Copy ssh-rsa to = sign. |
the created file must be used when connecting to the host. |
||||
8 |
bastion_ssh_key |
string |
<ssh_key> |
SSH key to setup bastion hosts - public key for terraform user |
9 |
app_eks_worker_nodes_ssh_key |
string |
<ssh_key> |
SSH key to setup with the worker nodes in app cluster EKS - public key for terraform user |
10 |
blk_eks_worker_nodes_ssh_key |
string |
<ssh_key> |
SSH key to setup with worker nodes in blk cluster EKS - public key for terraform user |
11 |
ses_email_identity |
string |
<emailId> |
email address added/verified in AWS SES service and to use with Cognito. |
Option 1: Set to empty if “cognito_default” used |
||||
Option 2: Set to valid email address if “developer” used. |
||||
12 |
userpool_email_source_arn |
string |
arn:aws:ses:<region>:<acc_number>:identity/<emailid> |
ARN of the verified email address in SES. |
Option 1: Set to empty if “cognito_default” used |
||||
Option 2: Set to valid RN if “developer” used. |
||||
13 |
app_cluster_map_users |
list(any) |
[“<userarn1>”,”<userarn2>”] |
List of IAM users ARN to allow EKS admin access |
Note: This can be set to empty in secrets if not applicable. Empty is [] |
||||
These users are created manually and must exist before referring to them. |
||||
14 |
blk_cluster_map_users |
list(any) |
[“<userarn1>”,”<userarn2>”] |
List of IAM users ARN to allow EKS admin access |
Note: This can be set to empty in secrets if not applicable. |
||||
These roles are created manually and must exist before referring to them. |
||||
15 |
app_cluster_map_roles |
list(any) |
[“<rolearn1>”,”<rolearn2>”] |
List of IAM roles ARN to allow EKS admin access |
Note: This can be set to empty in secrets if not applicable. |
||||
These roles are created manually and must exist before referring to them. |
||||
16 |
blk_cluster_map_roles |
list(any) |
[“<rolearn1>”,”<rolearn2>”] |
List of IAM roles ARN to allow EKS admin access |
Note: This can be set to empty in secrets if not applicable. |
||||
These roles are created manually and must exist before referring to them. |
||||
17 |
aws_input_bucket |
String |
<s3_bucket_name> |
Name of the S3 bucket which will have terraform input files NOTE: does it need the quotes? |
1.6. Prepare pipeline and submit
The resources required for a node are provisioned using two GitHub actions pipeline as described below.
A GitHub actions pipeline to provision core AWS resources.
2. A GitHub actions pipeline to provision core Kubernetes resources and relevant Route53 hosted zones setup
Note: The second pipeline is dependent on the first pipeline and hence the first pipeline needs to be executed and it should provision all AWS resources successfully before executing the second pipeline.
The first pipeline is used to provision all the base core AWS resources including Kubernetes clusters and the second pipeline is used to provision all relevant Kubernetes resources and its related Route 53 setup. The reason for this is the way terraform handles resource dependency and to tackle issues in connecting to Kubernetes. Refer to the below link for the details if you are interested to know more.
https://registry.terraform.io/providers/hashicorp/kubernetes/latest/docs

Let us ensure the below prerequisites are already setup before configuring the pipeline and trigger them.
GitHub repository and its relevant configuration
AWS IAM user
AWS IAM role
S3 bucket for terraform state files
S3 bucket for terraform input files
DynamoDB table for terraform state file locking for AWS resources
DynamoDB table for terraform state file locking for K8s resources
Verified email address in SES and its ARN if applicable
9. All required sensitive data as environmental secrets in GitHub under appropriate environment based on the relevant branch, node type and environment
SES moved out of sandbox if applicable
1. Clone the relevant branch according to node type and its environment. Example: aais_dev for aais node for dev environment (this could be dev to aais_dev)
#> git clone https://github.com/openidl-<org>/openidl-aais-gitops.git
2. Create a feature branch out of the base branch with appropriate naming standards to ensure it supports GitHub actions pipeline. The format for feature branches should follow <base_branch>*
Example: aais_dev_feature for aais_dev base branch.
Clone the repository and checkout the feature branch
1.6.1. Setup and execute the first pipeline
The first pipeline triggers when the update is pushed to feature branch and pull request is submitted, however there should be some change/update to the following files and directories
aws/aws_resources/*
aws/tf_s3_backend/aws_resources
1. Go to directory aws/tf_s3_backend/ and update the terraform backend configuration file named “aws_resources”.
#The below config declaration is applicable when using remote backend as S3 in terraform
#This is the backend configuration required to setup for the first pipeline used to setup AWS resources
bucket = “<s3_bucket_name_for_aws_resources_pipeline>”
key = “aws/terraform.tfstate”
region = “<aws_region>”
encrypt = true
workspace_key_prefix = “env”
##################reference example: https://dynamodb.us-east-1.amazonaws.com#################
dynamodb_endpoint = “https://dynamodb.<aws_region>.amazonaws.com”
dynamodb_table = “<dynamodb_table_name_setup>”
role_arn = “<IAM_role_arn>”
session_name = “terraform-session”
external_id = “<external_id>” #external id setup during IAM user and role setup for access
Go to aws/aws_resources directory and activate backend as S3 in main.tf file
Go to aws/aws_resources directory and activate code snippet relevant to git_actions and disable code snippet relevant to Jenkins in providers.tf
After updating backend configuration for the pipeline, the next step is to prepare the input file and upload to S3 bucket. Refer to directory aws/templates directory prepare the terraform input file.

Prepare the input file according to the node prepared to setup and upload to the S3 bucket which is setup to manage terraform input files.
Note: Each node and its environment (dev/test/prod) will have individual S3 Backend resources
Refer to templates or appendix section in this document on details of contents in input file.
Path |
Input file |
S3://<bucket_name>/ |
aais.tfvars |
S3://<bucket_name>/ |
carrier.tfvars |
S3://<bucket_name>/ |
analytics.tfvars |
The below are short description of each input that are required to setup in the input file.
variables¶ AWS area
Input name
Data type
Description
Organization
org_name
string
Set the organization name as below.
For aais node, set org_name = “aais”,
For analytics node, set org_name = “analytics”
For carrier node, set org_name = “<carrierogname>”. Example org_name = “travelers”.
Note: For aais’s dummy carrier set org_name=”carrier” for others set respective org name.
Environment
aws_env
string
Set to dev | test | prod
Create VPC
create_vpc
bool
Set to true to create VPC otherwise false for using existing VPC
VPC ID
vpc_id
string
VPC id when existing VPC is used
cluster VPC
vpc_cidr
string
Network CIDR for the clusters
availability_zones
list
List of availability zones for the clusters
public_subnets
list
List of subnet CIDRs for cluster public subnets
private_subnets
list
List of subnet CIDRs for cluster private subnets
bastion hosts
create_bastion_host
bool
Choose to provision bastion host
bastion host sg traffic rules
bastion_sg_ingress
list(any)
Ingress traffic rules to be allowed for bastion host in the clusters
bastion_sg_egress
list(any)
Egress traffic rules to be allowed for bastion host in the clusters
route53 (public)
domain_info (
map
r53_public_hosted_zone_required, domain_name, sub_domain_name, comments)
Choose whether to create public hosted zone in Route 53. When chosen to create hosted zone, it results name servers after terraform run. These name servers need to be added in the domain registrar under the list of domain’s name servers.
When chosen not to create hosted zone in route 53, it results list of URLs/FQDNs which are required to enter in the domain records.
Be sure to include ‘.com’ in the domain.
Subdomain is optional. leave empty quotes if not applicable
Cognito user pool
create_cognito_userpool
bool
Choose cognito pool to be created
userpool_name
string
A name to the user pool
email_sending_account
String
“COGNITO_DEFAULT” | “DEVELOPER” depends on email service is Cognito default or SES. Accordingly, setup secrets, SES service.
application EKS cluster
app_cluster_name
string
Application EKS cluster name
app_cluster_version
string
Application EKS cluster version. Refer to https://docs.aws.amazon.com/eks/latest/userguide/kubernetes-versions.html. Prefer n-1 version.
app_worker_nodes_ami_id
String
We use the x86 ami.
AMI ID for the EKS worker nodes. Refer to below link to identity the AMI ID based on EKS cluster version and the AWS region
https://docs.aws.amazon.com/eks/latest/userguide/eks-optimized-ami.html
To retrieve AMI ID:
https://docs.aws.amazon.com/eks/latest/userguide/retrieve-ami-id.html
for version 1.20 it would be:
#aws ssm get-parameter –name /aws/service/eks/optimized-ami/1.20/amazon-linux-2-x64/recommended/image_id –region us-east-1 –query “Parameter.Value” –output text
Blockchain EKS cluster
blk_cluster_name
string
Blockchain EKS cluster name
blk_cluster_version
string
Blockchain EKS cluster version
Refer to https://docs.aws.amazon.com/eks/latest/userguide/kubernetes-versions.html. Prefer n-1 version.
blk_worker_nodes_ami_id
We use the x86 ami.
AMI ID for the EKS worker nodes. Refer to below link to identity the AMI ID based on EKS cluster version and the AWS region
https://docs.aws.amazon.com/eks/latest/userguide/eks-optimized-ami.html
To retrieve AMI ID:
https://docs.aws.amazon.com/eks/latest/userguide/retrieve-ami-id.html
CloudTrail (audit logging)
create_cloudtrail
bool
Choose to enable cloudtrail
s3_bucke_name_cloudtrail
String
Name of the s3 bucket to use with CloudTrail, (NOTE: s3 bucket names should be unique globally). suggest <node_type>-<node_env>-<org_name>-cloudtrail
S3 bucket – terraform state – AWS resources
terraform_state_s3_bucket_name
String
Name of the S3 bucket that would be managing terraform state files of AWS resources (First pipeline backend s3 bucket name)
S3 bucket – HDS data analytics (applicable for analytics and carrier nodes only)
S3_bucket_name_hds_analytics
String
Name of the S3 bucket that would be used to store HDS analytics data. This is applicable only for carrier and analytics nodes. For AAIS node set to empty (“”)
S3 bucket public
create_s3_bucket_public
bool
Chose to provision s3 public bucket
S3_bucket_name_logos
String
Name of the S3 bucket that would be used to manage web page images (logos). This bucket would be publicly accessible
S3 bucket - S3 access logs
string
S3 bucket name to store s3 access logs
KMS keys
create_kms_keys
bool
Choose whether to use existing keys or create KMS keys
s3_kms_key_arn
string
KMS key ARN that will be used for encrypting s3 objects
eks_kms_key_arn
string
KMS key ARN that will be used for EKS secrets encryption
cloudtrail_cw_logs_kms_key_arn
string
KMS key ARN that will be used to encrypt coudtrail cloudwatch logs
vpc_flow_logs_kms_key_arn
string
KMS key ARN that will be used to encrypt VPC flow logs
secrets_manager_kms_key_arn
KMS key ARN that will be used to encrypt secrets
Logs retention
cw_logs_retention_period
number
Enter no of days to retain cloudtrail vpc flow logs and EKS logs
Custom tags
custom_tags
Custom tags to include { tag1 = “value1”
tag2 = “value2”}
Terraform Cloud/Enterprise as backend
tfc_org_name
string
Organization name in TFC/TFE
tfc_workspace_name_aws_resources
string
Terraform workspace that manages AWS resources
5. Upon compiling all the necessary inputs, save the file with proper naming standard. Note that the file name should be based on node_type as below
Node Type |
File Name |
aais |
aais.tfvars |
carrier |
carrier.tfvars |
analytics |
analytics.tfvars |
Upload the input file to S3 bucket that will manage terraform input files
Once input file is uploaded to S3, push the updated code to feature branch in GitHub
Submit a pull request to trigger the GitHub actions pipeline to perform terraform plan
Review and approve by submitting merge request which will further trigger the pipeline again to perform terraform apply to provision all AWS resources which are part of first pipeline
Finally review the results and capture the outputs that is resulted out of terraform apply
NOTE:
1. Direct push to the base branch will trigger the pipeline to deploy and hence direct pushes should be restricted as a best practice and always submit pull request via feature branch approach.
Apply complete! Resources: 247 added, 0 changed, 0 destroyed.
Outputs:
app_cluster_certificate = <sensitive>
app_cluster_endpoint = "https://990D62288F376DF77ADFFF3C86BDF27E.gr7.***.eks.amazonaws.com"
app_cluster_name = "aais-test-app-cluster"
app_cluster_token = <sensitive>
app_eks_nodegroup_role_arn = "arn:aws:iam::***:role/aais-test-app-node-group"
aws_name_servers = tolist([
"ns-1317.awsdns-36.org",
"ns-1752.awsdns-27.co.uk",
"ns-230.awsdns-28.com",
"ns-760.awsdns-31.net",
])
baf_automation_user = "arn:aws:iam::***:user/aais-test-baf-automation"
baf_automation_user_access_key = <sensitive>
baf_automation_user_arn = "arn:aws:iam::***:user/aais-test-baf-automation"
baf_automation_user_secret_key = <sensitive>
blk_cluster_certificate = <sensitive>
blk_cluster_endpoint = "https://F3C63D6BA2E393F5902A3A7A1F18BD66.gr7.***.eks.amazonaws.com"
blk_cluster_name = "aais-test-blk-cluster"
blk_cluster_token = <sensitive>
blk_eks_nodegroup_role_arn = "arn:aws:iam::***:role/aais-test-blk-node-group"
cloudtrail_s3_bucket_name = "aais-test-cloudtrail-logs"
cognito_app_client_id = <sensitive>
cognito_client_secret = <sensitive>
cognito_user_pool_id = <sensitive>
eks_admin_role_arn = "arn:aws:iam::***:role/aais-test-eks-admin"
git_actions_admin_role_arn = "arn:aws:iam::***:role/aais-test-gitactions-eksadm"
git_actions_iam_user = "arn:aws:iam::***:user/aais-test-gitactions-eksadm"
git_actions_iam_user_access_key = <sensitive>
git_actions_iam_user_arn = "arn:aws:iam::***:user/aais-test-gitactions-eksadm"
git_actions_iam_user_secret_key = <sensitive>
public_app_bastion_dns_name = "aais-test-app-bastion-nlb-02ce3e814b44d2ca.elb.***.amazonaws.com"
public_app_bastion_fqdn = "app-bastion.test.demo.aaistrail.com"
public_blk_bastion_dns_name = "aais-test-blk-bastion-nlb-b3ca1cbdec8e9c09.elb.***.amazonaws.com"
public_blk_bastion_fqdn = "blk-bastion.test.demo.aaistrail.com"
r53_private_hosted_zone_id = "Z0381771KQJ26J731T82"
r53_private_hosted_zone_internal_id = "Z0897486P9UUA7P72MYT"
r53_public_hosted_zone_id = "Z02822423RAVGXT3BB9H9"
secret_manager_vault_secret_arn = "arn:aws:secretsmanager:***:***:secret:test-aais-vaultssssecret-Jjlg99"
1.6.2. Setup and execute the second pipeline
Once the first pipeline is completed and all the AWS resources are provisioned, and it is all set to trigger the second pipeline to provision Kubernetes resources. To do this, follow the below steps.
1. Go to the repository on the local system which was initially cloned part of setting up the first pipeline
2. Go to aws/tf_s3_backend and update terraform backend configuration for this second pipeline in the file named “k8s_resources”
#The below config declaration is applicable when using remote backend as S3 in terraform
#This backend configuration is used for 2nd pipeline to setup k8s resources
bucket               = "<s3_bucket_name_k8s_resources>"
key                  = "k8s/terraform.tfstate"
region               = "<aws_region>"
encrypt              = true
workspace_key_prefix = "env"
##################reference example: https://dynamodb.us-east-1.amazonaws.com#################
dynamodb_endpoint    = "https://dynamodb.<aws_region>.amazonaws.com"
dynamodb_table       = "<dynamodb_table_state_locking_k8s_resources>"
role_arn             = "<IAM_role_arn>"
session_name         = "terraform-session"
external_id          = "<external_id>" #external id setup during IAM user and role setup for access role setup for access
Go to aws/k8s_resources and activate code snippet to keep S3 as backend
Go to aws/k8s_resources and update providers.tf and activate code snippet relevant to git actions and disable code relevant to Jenkins
Go to aws/k8s_resources and updata data.tf and activate code snippet relevant to S3 as backend and disable code relevant to TFC/TFE as backend
Once the mentioned updates completed, there are not any other updates/input file generation required as both the pipelines will be using the common input file which was prepared and uploaded to S3 bucket part of setting up first pipeline.
Hence push the code to repository again and submit pull request to generate terraform plan
Further careful review submits merge request to get this second pipeline triggered this time which will provision all k8s resources.
Please note that, this pipeline is triggered when there is a change to directory/files of the below
Aws/k8s_resources
Aws/tf_s3_backend/k8s_resources
In case this pipeline is somehow triggered before first pipeline is successful in provisioning AWS resources, this would fail as it depends on first pipeline.
Warnings:

- Value for undeclared variable
- Value for undeclared variable
- Values for undeclared variables

To see the full warning notes, run Terraform without -compact-warnings.

Apply complete! Resources: 19 added, 0 changed, 0 destroyed.

Outputs:
private_ca-aais-net_fqdn = "ca.aais-net.aais.test.demo.aaistrail.com"
private_ca-ordererorg-net_fqdn = "ca.ordererorg-net.ordererorg.test.demo.aaistrail.com"
private_common_fqdn = "*.aais-net.aais.test.demo.aaistrail.com"
private_data_call_service_fqdn = "data-call-app-service.test.demo.internal.aaistrail.com"
private_insurance_manager_service_fqdn = "insurance-data-manager-service.test.demo.internal.aaistrail.com"
private_ordererorg_fqdn = "*.ordererorg.test.demo.aaistrail.com"
private_vault_fqdn = "vault.test.demo.internal.aaistrail.com"
public_app_ui_url = "openidl.test.demo.aaistrail.com"
public_common_fqdn = "*.aais-net.aais.test.demo.aaistrail.com"
public_data_call_service_fqdn = "data-call-app-service.test.demo.aaistrail.com"
public_insurance_manager_service_fqdn = "insurance-data-manager-service.test.demo.aaistrail.com"
public_ordererog_fqdn = "*.ordererorg.test.demo.aaistrail.com"
public_utilities_service_fqdn = "utilities-service.test.demo.aaistrail.com"
The warnings could be softly ignored as this is because both the pipeline using the same terraform input file and these are because the second pipeline use only subset of data from the input file. Hence, they are safe to ignore.
Finally note down the outputs of first pipeline and second pipeline as
they are further required in setting up the environment.
1.6.3. Disable access keys and setup new access keys
The terraform pipeline provisions three vital AWS IAM user resources. As this is provisioned part of terraform these user access and secret keys are in terraform state file.
The initial provisioned access keys and secret keys should not be used, and it should be set as INACTIVE(Do not delete them). Further create new access keys and secret keys for these users and use them.
NOTE: The name of the user has the first part truncated from the org_name. That is “carrier” becomes “carr-dev-baf-automation” which could cause a problem during testing if creating more than one carrier.
1.6.4. Remove security rule created by Kubernetes HA proxy deployment
Once AWS resources are provisioned. The following security rules from the security groups are required to remove as they are deployed by default by Ingress Controller deployment in Kubernetes cluster.
Refer to the following security groups to identify the rule and remove it.
Go to EC2/VPC services section in the AWS console
Go to Security Group section
Look for the security group as mentioned in the above table

Open the security group and look for the rule related to ICMP set with source 0.0.0.0/0 and remove it. The below screenshot is a reference. Please remove only this rule only.

Remove this rule from both (two) security groups as mentioned the table above.
1.7. References – Inputs
1.7.1. Input Template
#Terraform backend specification | terraform_state_s3_bucket_name = “” # when s3 is used for TF state backend | tf_org_name = “” # organization name in Terraform Cloud/Enterprise when TFC/TFE is used for backend | tf_workspace_name_aws_resources = “” # Terraform workspace chosen for AWS resources when TFC/TFE is used | #——————————————————————————————————————– #Applicable only to analytics and carrier node. For AAIS node set this to empty | s3_bucket_name_hds_analytics = “” #S3 bucket name to manage HDS analytics data when node is analytics/carrier | #——————————————————————————————————————– #Name of Public S3 bucket used to manage logos which is optional. | create_s3_bucket_public = “true” | Helps to choose decide in provisioning public s3 bucket | s3_bucket_name_logos = “” # public s3 bucket name | #——————————————————————————————————————– #Name of S3 bucket to store access logs of S3 bucket and its objects | s3_bucket_name_access_logs = “” # bucket name to store s3 access logs | #——————————————————————————————————————– #KMS keys to be either created or used existing Keys | create_kms_keys = “true” # Set to true to create keys and false to use existing keys | s3_kms_key_arn = “” #KMS key ARN that will be used to encrypt S3 | eks_kms_key_arn = “” #KMS key ARN that will be used to encrypt EKS secrets | cloudtrail_cw_logs_kms_key_arn = “” #KMS key ARN that will be used to encrypt cloutrail cloudwatch logs | vpc_flow_logs_kms_key_arn = “” #KMS key ARN that will be used to encrypt VPC flow logs | secrets_manager_kms_key_arn = “” #KMS key ARN that will be used to encrypt secrets | #——————————————————————————————————————– #Cloudwatch logs retention period (VPC flow logs, EKS logs and cloutrail logs) | cw_logs_retention_period = “<days>” #example 90 days | #——————————————————————————————————————– | custom_tags = { <tag1> = “<value1>”, <tag2> = “<value2>” } # custom tags to include
1.7.2. Sample input file used for aais_node setup
org_name = “aais” aws_env = “dev”
#——————————————————————————————————————– #Choose whether to create VPC or use existing VPC create_vpc = “true”
#Key in VPC ID when create_vpc is set to false vpc_id = “”
#Key in for the below when create_vpc is set to true # 3 Availability Zones required vpc_cidr = “172.18.0.0/16” availability_zones = [“us-east-2a”, “us-east-2b”, “us-east-2c”] public_subnets = [“172.18.1.0/24”, “172.18.2.0/24”, “172.18.5.0/24”] private_subnets = [“172.18.3.0/24”, “172.18.4.0/24”, “172.18.6.0/24”] #——————————————————————————————————————– #Bastion host specs. It is provisioned in autoscaling group and gets an Elastic IP assigned #Choose whether to provision bastion host create_bastion_host = “true”
#when chosen to create bastion host, set the required IP address or CIDR block that is allowed SSH access to bastion host bastion_sg_ingress = [{rule=”ssh-tcp”, cidr_blocks = “3.237.88.84/32”}] bastion_sg_egress = [{rule=”ssh-tcp”, cidr_blocks = “3.237.88.84/32”}] #——————————————————————————————————————– #Route53 (PUBLIC) DNS domain related specifications domain_info = {
r53_public_hosted_zone_required = “yes”, #Options: yes | no - This allows to chose whether to setup public hosted zone in Route53 domain_name = “aaisdirect.com”, #Primary domain registered sub_domain_name = “”, #Sub domain if applicable. Otherwise it can be empty quotes comments = “aais-dev node domain”
} #——————————————————————————————————————– #Cognito specifications #Chose whether to provision Cognito user pool create_cognito_userpool = “true”
#When cognito is choosen to provision set the below userpool_name = “openidl” #unique user_pool name
# COGNITO_DEFAULT - Uses cognito default. When set to cognito default SES related inputs goes empty in git secrets # DEVELOPER - Ensure inputs ses_email_identity and userpool_email_source_arn are setup in git secrets email_sending_account = “COGNITO_DEFAULT” # Options: COGNITO_DEFAULT | DEVELOPER #——————————————————————————————————————– # application cluster EKS specifications app_cluster_name = “app-cluster” app_cluster_version = “1.20” app_worker_nodes_ami_id = “ami-09fd0b5dd68327412” #——————————————————————————————————————– # blockchain cluster EKS specifications blk_cluster_name = “blk-cluster” blk_cluster_version = “1.20” blk_worker_nodes_ami_id = “ami-09fd0b5dd68327412” #——————————————————————————————————————– #cloudtrail related #Choose whether to enable cloudtrail create_cloudtrail = “true”
#S3 bucket name to manage cloudtrail logs s3_bucket_name_cloudtrail = “openidl-cloudtrail” #——————————————————————————————————————– #Terraform backend specification when S3 is used terraform_state_s3_bucket_name = “openidl-tf-state” #——————————————————————————————————————– #Terraform backend specifications when Terraform Enterprise/Cloud is used #Name of the TFE/TFC organization tfc_org_name = “” #Name of the workspace that manages AWS resources tfc_workspace_name_aws_resources = “” #——————————————————————————————————————– #Applicable only to analytics and carrier nodes and not applicable to AAIS node. For AAIS it can be empty. #Name of the S3 bucket used to store the data extracted from HDS for analytics
s3_bucket_name_hds_analytics = “openidl-hds” #——————————————————————————————————————– #Name of the PUBLIC S3 bucket used to manage logos #Optional: Choose whether s3 public bucket is required to provision create_s3_bucket_public = “true”
s3_bucket_name_logos = “openidl-public-logos” #——————————————————————————————————————– #Name of the S3 bucket to store S3 bucket and its object access logs s3_bucket_name_access_logs = “openidl-access-logs” #——————————————————————————————————————– #KMS Key arn to be used when create_kms_keys is set to false create_kms_keys = “true” s3_kms_key_arn = “” eks_kms_key_arn = “” cloudtrail_cw_logs_kms_key_arn = “” vpc_flow_logs_kms_key_arn = “” secrets_manager_kms_key_arn = “”
#——————————————————————————————————————– #Cloudwatch logs retention period (For VPC flow logs, EKS logs, Cloudtrail logs) cw_logs_retention_period = “90” #example 90 days #——————————————————————————————————————– #Custom tags to include
- custom_tags = {
department = “openidl” team = “demo-team”
}
1.8. How to run GitHub Actions pipeline to update the Hyperledger Fabric Network
1. Login into the “openidl-aais-gitops” repository and navigate to the Action Tab in GitHub account (reference to screenshot below)

2. Click on the “Deploy Blockchain Network” workflow under the “Workflow” section (reference to screenshot below)

Click on “Run workflow” (reference to screenshot below)

“Run workflow” fields
Use workflow from |
Develop branch or the branch where the workflow file and its dependent files exist to be used. |
|---|---|
ORGANIZATION NAME |
Organization name to use for deploying the Blockchain network. |
ENVIRONMENT |
Environment name to use for deploying the Blockchain network ex: dev, stage, or prod |
ACTION |
Action name, refer to Section#2 |
CHANNEL NAME |
By default, the value of this field is set to “defaultchannel”. It can be changed as per requirements. |
EXTRA ARGUMENTS |
If there are any Extra Arguments need to be passed while running the pipeline |
CHAINCODE VERSION |
Version of the chaincode that needs to be installed (Format: MMDDTTTT) |
ORGANIZATION NAME |
This is required when action is ‘add_new_org’ |

5. Once the required arguments are updated in the dialog box, click on the button “Run workflow” which will start the workflow.
Use the Managing the Network section to setup the network
1.8.1. GitHub Actions list for setting the blockchain network and components
baf_image – This action will build the baf docker image and push it to the “ghcr.io” registry
vault – This action will deploy the vault cluster, unseal vault cluster, create secret paths inside vault for storing crypto material, add users and paths for config, kvs
deploy_network - This action will create a pod to setup flux and deploy the Blockchain network with CA, Peer, Orderers and create the channel, joins the peers to channel and updates channel with anchor peer.
chaincode: This action will create a pod to install the chaincode on the peers, approve the chaincode on a channel, commit the chaincode on a channel, invoke the chaincode on the channel. This action should be executed per channel by each organization. Chaincode version should be passed as an input.
join_peer - This action will create a pod to join peers to the channel. This action will only be performed by analytics and carrier organizations after the completion of add_new_org action by aais to add respective organizations.
register_users – This action is used to preregister the application users on CA.
add_new_channel - This action will create a pod to create new channel. Prior to executing this step, make sure new channel information is added to organization configuration file.
add_new_org - This action will create a pod to add the new organization to consortium. Prior to executing this step, make sure to add organization name and its domain under organizations section in organization configuration file.
new_org - This action will create a pod to setup flux and deploy a new organization with CA and Peers on the network. Org Credentials and MSP definition will be uploaded to the vault.
reset - This action will reset the Blockchain network
health_check - This is sample action to perform health check
vault_cleanup – This action is used to cleanup vault when applicable
1.9. Deploying Application (UI and Services)
Following are steps to deploy Application and UI Services
Create MongoDB on Application Cluster
Create Application Configuration Files from Templates
Add Application Configuration Files to Vault on the Blockchain Cluster
Run the github actions pipeline to deploy secrets and application helm charts
Create Admin User in Cognito
Create Application User using Utilities Service
1.9.1. Deploy MongoDB (GitHub Actions)-
NOTE: In case during mongoDB deployment if it fails due to issues before rerunning again after resolving issues, please run clean-up job first to remove all the leftovers.
ACTION NAME: mongodb_cleanup – It is used to cleanup the leftovers by action mongodb
Login into the “openidl-aais-gitops” repository and navigate to the Action Tab in GitHub account (reference to screenshot below)

2. Click on the “Deploy Mongo DB” workflow under the “Workflow” section (reference to screenshot below)

Click on “Run workflow” with following fields
Use workflow from |
Branch to run the pipeline against for deploying the Blockchain network |
|---|---|
ORGANIZATION NAME |
Organization name to use for deploying the Mongo DB |
ENVIRONMENT |
Environment name to use for deploying the Mongo DB ex: dev, stage, or prod |
5. Once the required arguments are updated in the dialog box, click on the button “Run workflow” which will start the workflow.
1.9.1.1. Port Forwarding to Mongo DB-
Setup AWS CLI and log-in using aws_access_key_id and aws_secret_access_key
Set the context for application cluster
Example: >aws eks update-kubeconfig –region <region> –name <app-cluster>
Setup port forward using below command
# kubectl port-forward –namespace database svc/${ORG_NAME}-mongodb-headless 27017:27017
NOTE: if you are running mongo locally, you should use another port like 28017:27017
Connect to Mongo DB using Compass with following URL
# mongodb://${MONGODB_USERNAME}:${MONGODB_PASSWORD}@localhost:27017 /openidl-offchain-db?authSource=openidl-offchain-db
NOTE: the mongodb_username and mongodb_password are put into the aws secrets manager at <org_name>-<env>-mongodb-user for the username and <org_name>-<env>-mongodb-user-token for the password
1.9.2. Creating Application Configuration files-
Use the application configuration templates to replace the following files for each individual organization. These files are found in the openidl-config directory in the openidl-main repository. Copy the template config file to create a usable config file with all the correct values. Then run #make copy_config_files to generate correct config files in the config directory.
There are targets available for specific like #make copy_carrier_secrets
1.9.2.1. AAIS Variables-
JSON File Name |
Values to be Replaced |
|---|---|
channel-config.json |
AAIS_ORGNAME: aais CARRIER_ORGNAME: trv Add cross channel query params for all carriers |
c onnection-profile.json |
Refer to 11.2.4 Creating Connection Profile AAIS_ORGNAME: aais ENV: DEV DOMAIN: techiething TLS_CERT: CA TLS Certificate |
insurance-data-manag er-channel-config.json |
AAIS_ORGNAME: aais |
listen er-channel-config.json |
AAIS_ORGNAME: aais ANALYTICS_ORGNAME: analytics |
local-cog nito-admin-config.json |
AWS Credentials AWS_ACCESS_KEY_ID AWS_SECRET_ACCESS_KEY AWS_REGION Refer to IAM user provisioned for application. <orgname>-<envtype>-openidl-apps-user. Use this user credentials. |
loc al-cognito-config.json |
Cognito Config COGNITO_USERPOOLID COGNITO_CLIENTID COGNITO_REGION |
local-db-config.json |
Mongo DB URL with credentials MONGO_DB_USERNAME MONGO_DB_PASSWORD AAIS_ORGNAME: aais |
l ocal-vault-config.json |
AWS Credentials and AWS Secret Name for Vault AWS_ACCESS_KEY_ID AWS_SECRET_ACCESS_KEY AWS_REGION VAULT_SECRET_NAME: Look for this in AWS Secret Manager. Format <AAIS_ORGNAME>-<ENV>-kvs-vault Ex: aais-dev-kvs-vault Refer to IAM user provisioned for application. <orgname>-<envtype>-openidl-apps-user. Use this user credentials. |
targ et-channel-config.json |
AAIS_ORGNAME: aais ANALYTICS_ORGNAME: analytics |
u i-mappings-config.json |
AAIS_ORGNAME: aais ENV: DEV DOMAIN: techiething SUBDOMAIN AWS_REGION S3_BUCKET_NAME_LOGOS |
util ties-admin-config.json |
Fabric CA Admin Credentials AAIS_ORGNAME: aais |
1.9.2.2. Analytics Variables-
JSON File Name |
Values to be Replaced |
|---|---|
channel-config.json |
AAIS_ORGNAME: aais ANALYTICS_ORGNAME: analytics |
c onnection-profile.json |
Refer to 11.2.4 Creating Connection Profile ANALYTICS_ORGNAME: analytics ENV: DEV DOMAIN: techiething TLS_CERT: CA TLS Certificate |
data-call-mood-listen er-channel-config.json |
AAIS_ORGNAME: aais ANALYTICS_ORGNAME: analytics CARRIER_ORGNAME: trv Add listener channels for all carriers Ex: analytics-trv |
data-c all-mood-listener-targ et-channel-config.json |
ANALYTICS_ORGNAME: analytics |
local-cog nito-admin-config.json |
AWS Credentials AWS_ACCESS_KEY_ID AWS_SECRET_ACCESS_KEY AWS_REGION Refer to IAM user provisioned for application. <orgname>-<envtype>-openidl-apps-user. Use this user credentials. |
loc al-cognito-config.json |
Cognito Config COGNITO_USERPOOLID COGNITO_CLIENTID COGNITO_REGION |
[STRIKEOUT :local-db-config.json] [STRIKEOUT:NOT NEEDED ON analytics node] |
[STRIKEOUT:Mongo DB URL with credentials] [STRIKEOUT:MONGO_DB_USERNAME] [STRIKEOUT:MONGO_DB_PASSWORD] [STRIKEOUT:ANALYTICS_ORGNAME: analytics] |
l ocal-vault-config.json |
AWS Credentials and AWS Secret Name for Vault AWS_ACCESS_KEY_ID AWS_SECRET_ACCESS_KEY AWS_REGION VAULT_SECRET_NAME: Look for this in AWS Secret Manager. Format <ANALYTICS_ORGNAME>-<ENV>-kvs-vault Ex: analytics-dev-kvs-vault Refer to IAM user provisioned for application. <orgname>-<envtype>-openidl-apps-user. Use this user credentials. |
local-cog nito-admin-config.json |
AWS Credentials AWS_ACCESS_KEY_ID AWS_SECRET_ACCESS_KEY AWS_REGION Refer to IAM user provisioned for application. <orgname>-<envtype>-openidl-apps-user. Use this user credentials. |
transacti onal-data-event-listen er-channel-config.json |
AAIS_ORGNAME: aais ANALYTICS_ORGNAME: analytics CARRIER_ORGNAME: trv Add listener channels for all carriers Ex: analytics-trv |
transactional-da ta-event-listener-targ et-channel-config.json |
ANALYTICS_ORGNAME: analytics |
u i-mappings-config.json |
ANALYTICS_ORGNAME: analytics ENV: DEV DOMAIN: techiething SUBDOMAIN AWS_REGION S3_BUCKET_NAME_LOGOS |
util ties-admin-config.json |
Fabric CA Admin Credentials ANALYTICS_ORGNAME: analytics |
s3-bucket-config.json |
AWS_ACCESS_KEY AWS_SECRET_KEY AWS_REGION S3_BUCKET_NAME_HDS_ANALYICS Refer to IAM user provisioned for application. <orgname>-<envtype>-openidl-apps-user. Use this user credentials. |
1.9.2.3. Carrier Variables-
JSON File Name |
Values to be Replaced |
|---|---|
channel-config.json |
CARRIER_ORGNAME: trv ANALYTICS_ORGNAME: analytics Add cross channel query params for all carriers |
c onnection-profile.json |
Refer to 11.2.4 Creating Connection Profile CARRIER_ORGNAME: trv ENV: DEV DOMAIN: techiething TLS_CERT: CA TLS Certificate |
insurance-data-manag er-channel-config.json |
CARRIER_ORGNAME: trv ANALYTICS_ORGNAME: analytics |
listen er-channel-config.json |
CARRIER_ORGNAME: trv ANALYTICS_ORGNAME: analytics |
local-cog nito-admin-config.json |
AWS Credentials AWS_ACCESS_KEY_ID AWS_SECRET_ACCESS_KEY AWS_REGION Refer to IAM user provisioned for application. <orgname>-<envtype>-openidl-apps-user. Use this user credentials. |
loc al-cognito-config.json |
Cognito Config COGNITO_USERPOOLID COGNITO_CLIENTID COGNITO_REGION |
local-db-config.json |
Mongo DB URL with credentials MONGO_DB_USERNAME MONGO_DB_PASSWORD AAIS_ORGNAME: aais |
l ocal-vault-config.json |
AWS Credentials and AWS Secret Name for Vault AWS_ACCESS_KEY_ID AWS_SECRET_ACCESS_KEY AWS_REGION VAULT_SECRET_NAME: Look for this in AWS Secret Manager. Format <AAIS_ORGNAME>-<ENV>-kvs-vault Ex: aais-dev-kvs-vault Refer to IAM user provisioned for application. <orgname>-<envtype>-openidl-apps-user. Use this user credentials. |
targ et-channel-config.json |
CARRIER_ORGNAME: trv ANALYTICS_ORGNAME: analytics |
u i-mappings-config.json |
CARRIER_ORGNAME: trv ENV: DEV DOMAIN: techiething SUBDOMAIN AWS_REGION S3_BUCKET_NAME_LOGOS |
util ties-admin-config.json |
Fabric CA Admin Credentials CARRIER_ORGNAME: trv |
s3-bucket-config.json |
AWS_ACCESS_KEY AWS_SECRET_KEY AWS_REGION S3_BUCKET_NAME_HDS_ANALYICS Refer to IAM user provisioned for application. <orgname>-<envtype>-openidl-apps-user. Use this user credentials. |
1.9.2.4. Creating CA TLS CERT for connection profile-
1. Connect to vault using port-forwarding and AWS secret manager for secrets (refer 11.2.5 Connecting to vault)
CA TLS certificate is available at below path
http://localhost:8200/ui/vault/secrets/aais/show/crypto/peerOrganizations/aais-net/ca
(Replace aais with correct organization name when applicable)
Get the .pem secret contents.
Copy TLS certificate into VS Code
3.1 Use replace all values
3.2 Select use regular expression (little ‘.*’ icon on search)
3.3 Replace “n” with \n

After replacing all, final output would look like below.

Replace the following values in connection-profile template
Variable |
Description |
Example Value |
|---|---|---|
AAIS_ORGNANE |
Organization Name |
aais |
ENV. |
Environment Name |
dev |
DOMAIN |
Domain Name |
aais.techiething |
TLS_CERT |
CA TLS Certificate |
Formatted CA Certificate from Vault. If using the copy_secrets routine, you will need to copy this value into the result file since the \n is reinstated as part of the copy. |
1.9.2.5. Connecting to Vault Cluster (CA TLS Certificate)-
Setup AWS CLI and log-in using aws_access_key_id and aws_secret_access_key
Set the context for blockchain cluster
Example: >aws eks update-kubeconfig –region <region> –name <blockchain-cluster>
Get the vault root token from AWS Secret Manager
Vault root token will be available at <org>-<env>-vault-unseal-key. Ex: aais-dev-vault-unseal-key

Click on retrieve secret value to get the vault root token

Setup port forward using below command
#kubectl port-forward –namespace vault svc/vault 8200:8200
Vault should be available at http://localhost:8200/
Login to vault using root token retrieved from AWS secret manager

The certificates can be checked further like below
CA Certificate is available at the below path. Replace <orgname> with organization name

1.9.3. Adding config files to Vault-
Setup AWS CLI and login using AWS access key and secret key
Set the cluster context to blockchain cluster
#aws eks update-kubeconfig –region <region> –name <blockchain-cluster>
Create a file ubuntu.yml and paste the following content in the file (this file is available in the openidl-config directory)
apiVersion: v1 kind: Pod metadata: name: ubuntu spec: containers:
image: ubuntu:latest # Just spin & wait forever command: [‘/bin/bash’, ‘-c’, ‘–‘] args: [‘while true; do sleep 30; done;’] |
|---|
Create a new pod in the default namespace #kubectl apply -f ./ubuntu.yml
Copy the config files and pull-vault-config script (from openidl-config directory)
# kubectl cp config/config-dev-<node_type>/ default/ubuntu:config
# kubectl cp ../vault-scripts/add-vault-config.sh default/ubuntu:add-vault-config.sh
Exec into the pod #kubectl exec –stdin –tty ubuntu – /bin/bash
Update the pod and install vim/curl/jq
#apt-get update
#apt-get install vim jq curl
Check whether the files are copied correctly into the pod. You should see the file “add-vault-config.sh” in “/” folder
Set execute permission to the script #chmod +x add-vault-config.sh
If these files are copied from windows, then it requires to convert the file from dos2unix. Follow below steps 10.1 Install dos2unix utility #apt-get install dos2unix -y 10.2 convert the file to unix #dos2unix add-vault-config.sh
Get the vault credentials from AWS secret manager
Vault credentials will be available at <org>-<env>-config-vault.
Example: dev-aais-config-vault

Click on retrieve secret value to get the credentials

Retrieve secret value to get all the values you need.
Run the script add-vault-config to update the vault with all config files.
# ./add-vault-config.sh -V <url> -U <username> -P <password> -a <vaultPath> -o <orgName from secret> -c ./config
Mapping of values for add-vault-config script to AWS Secrets
Input Param |
Secret Key |
|---|---|
V |
url |
U |
username |
P |
password |
a |
vaultPath |
o |
orgName |
c |
Config Path |
Finally delete the pod after some time just keep around to make sure all is ok.
#kubectl delete pod ubuntu
1.9.4. GitHub Actions to Deploy Secrets and Application-
1.9.4.1. Pipeline to deploy secrets-
Pipeline File |
Prerequisites |
Trigger |
Description |
|---|---|---|---|
deploy-openidl-secrets.yml |
Based on node type and environment ensure that the secrets are configured as environment secrets. |
Manual trigger. Input org_name and env_type to trigger the pipeline for deploying secrets |
The pipeline is used to deploy secrets. This should be executed before deploying OpenIDL application |
Name format: should be <env>-<org-name> (NOT: <env-type>-<node-type>) |
|||
#1. gitactions_user_access_key (use your gitactions_eksadm user access key) |
|||
#2. gitactions_user_secret_key |
|||
(use your gitactions_eksadm user secret key) |
|||
#3. gitactions_eksadm_role (this is the arn) |
|||
#4. gitactions_external_id (git-actions) |
|||
#5. aws_region |
|||
#6. app_cluster_name |
|||
#7. vault_secret_name (name of the secret setup in vault to retrieve credentials. Refer to AWS Secret Manager to identify the vault secret names provisioned. Format <orgname>-<env>-config-vault. Ex: aais-dev-config-vault |
1. Go to GitHub and Actions section, look for Deploy openIDL secrets and trigger the pipeline with below inputs
i. org_name – Name of the organization. Example: aais | analytics | trv etc
env_type – Type of the environment. Example: dev | test | prod
Upon the pipeline is manually triggered it deploys the secrets for openIDL application.
1.9.4.1.1. Troubleshooting-
If you see an error in the secret deployment or the app deployment.
If you see an error in the log that it can’t copy the secrets or an error of cannot iterate over null, then you are missing a rule in the policies for vault.
The pods don’t start because of errors in the config files
Go into vault on the blk cluster through the port-forward.
Go to the policies tab.
Open the config… policy.
If there is only, the first line, then copy it to make the second line changing config/data to config/metadata and save.

1.9.4.2. Pipeline to deploy application
Pipeline File |
Prerequisites |
Trigger |
Description |
|---|---|---|---|
deploy-openidl-secrets.yml |
Based on node type and environment ensure that the secrets are configured as environment secrets. |
Manual trigger. Input org_name and env_type to trigger the pipeline for deploying secrets |
The pipeline is used to deploy secrets. This should be executed before deploying OpenIDL application |
Name format: should be <env>-<org-name> (NOT: <env-type>-<node-type>) |
|||
#1. gitactions_user_access_key (use your gitactions_eksadm user access key) |
|||
#2. gitactions_user_secret_key |
|||
(use your gitactions_eksadm user secret key) |
|||
#3. gitactions_eksadm_role (this is the arn) |
|||
#4. gitactions_external_id (git-actions) |
|||
#5. aws_region |
|||
#6. app_cluster_name |
|||
#7. vault_secret_name (name of the secret setup in vault to retrieve credentials. Refer to AWS Secret Manager to identify the vault secret names provisioned. Format <orgname>-<env>-config-vault. Ex: aais-dev-config-vault |
The following steps are required to get this pipeline triggered.
Ensure the required environment secrets are configured
2. According to node type and environment, ensure that the relevant pipeline file is available/updated.
3. Update the global-values-<env>-<node>.yml file and push the code to relevant branch to trigger the pipeline which eventually deploy application on the application cluster (AWS EKS cluster)
1.9.4.2.1. Verification and Troubleshooting
Use one of the urls to access the utilities api. It should be part of the output.
If it works, you are good to go onto the testing.
If you get default host 404, then you have a configuration error.
Check the ingresses in the Kubernetes app cluster to make sure they are going to the correct urls.
1.9.4.3. Pipeline to build and push images to repository
GitHub Actions Pipeline |
GiHub Workflow File |
Trigger |
Description |
|---|---|---|---|
Build image for openidl data call app |
publish-openidl-data-call-app.yml |
Triggered when change is pushed to develop branch and any changes to openidl-data-call-app/* |
This builds an image and pushes to ghcr.io repository for openidl data call project |
Build image for openidl data call mood listener |
publish-openidl-data-call-mood-listener.yml |
Triggered when change is pushed to develop branch and any changes to openidl-data-call-mood-listener/* |
This builds an image and pushes to ghcr.io repository for openidl data call mood listener project |
Build image for openidl data call processor |
publish-openidl-data-call-processor.yml |
Triggered when change is pushed to develop branch and any changes to openidl-data-call-processor/* |
This builds an image and pushes to ghcr.io repository for openidl data call processor project |
Build image for openidl insurance data manager |
publish-openidl-insurance-data-manager.yml |
Triggered when change is pushed to develop branch and any changes to openidl-insurance-data-manager/* |
This builds an image and pushes to ghcr.io repository for openidl insurance data manager project |
Build image for openidl transactional data event listener |
publish-openidl-transactional-data-event-listener.yml |
Triggered when change is pushed to develop branch and any changes to openidl-transactional-data-event-listener/* |
This builds an image and pushes to ghcr.io repository for openidl transactional data event listener project |
Build image for openidl UI workspace |
publish-openidl-UI-workspace.yml |
Triggered when change is pushed to develop branch and any changes to openidl-ui-workspace/* |
This builds an image and pushes to ghcr.io repository for openidl UI workspace project |
Build image for openidl utilities |
publish-openidl-utilities.yml |
Triggered when change is pushed to develop branch and any changes to openidl-utilities/* |
This builds an image and pushes to ghcr.io repository for openidl utilities project |
1.9.5. Adding Application Users
1.9.5.1. Create Admin User in Cognito
Log into AWS Console and select the Cognito User Pool. Click on ‘Users and Groups’

Select ‘Create User’ and provide the required information. See screenshot below

The phone number must be in the form +11112223333
Once the user gets created, password will need to be changed. Go to ‘App Client Settings’ and ‘Launch Hosted UI’
Log-in using the credentials of the admin user which was just created

Change the password
1.9.5.2. Adding application users using Utilities Service-
Launch the Utilities Service Swagger at http://utilities-service ${ENV}.${ORGNAME}.${DOMAIN}.com/api-docs
Ex: http://utilities-service.dev.analytics.techiething.com/api-docs

Select ‘app-user-login’ and provide the cognito user admin credentials. Get the ‘userToken’ from response and ‘Authorize’ the user
Select ‘app-user-creation’ and provide the necessary information for creating the user. Following are the examples for creating users for different organizations
Organ ization |
Request Body |
|---|---|
AAIS |
{ “users”: [ { “username”: “liz@lazarus.com”, “password”: “<password>”, “familyName”: “liz”, “givenName”: “blockchain”, “email”: “liz@lazarus.com”, “attributes”: { “custom:stateName”: “Colorado”, “custom:stateCode”: “05”, “custom:role”: “stat-agent”, “custom:organizationId”: “12345” } } ] } |
Analytics |
{ “users”: [ { “username”: “test_user1@regulator.com”, “password”: “<password>”, “familyName”: “test”, “givenName”: “user1”, “email”: “test_user1@regulator.com”, “attributes”: { “custom:stateName”: “Colorado”, “custom:stateCode”: “05”, “custom:role”: “regulator”, “custom:organizationId”: “colorado doi” } } ] } |
Carrier |
{ “users”: [ { “username”: “david@AAISonline.com”, “password”: “<password>”, “familyName”: “david”, “givenName”: “aais”, “email”: “david@AAISonline.com”, “attributes”: { “custom:stateName”: “Colorado”, “custom:stateCode”: “05”, “custom:role”: “carrier”, “custom:organizationId”: “12345” } } ] } |
1.10. Adding application users using Utilities Service
Launch the Utilities Service Swagger at http://utilities-service ${ENV}.${ORGNAME}.${DOMAIN}.com/api-docs
Ex: http://utilities-service.dev.analytics.techiething.com/api-docs

Select ‘app-user-login’ and provide the cognito user admin credentials. Get the ‘userToken’ from response and ‘Authorize’ the user
Select ‘app-user-creation’ and provide the necessary information for creating the user. Following are the examples for creating users for different organizations
Organ ization |
Request Body |
|---|---|
AAIS |
{ “users”: [ { “username”: “liz@lazarus.com”, “password”: “<password>”, “familyName”: “liz”, “givenName”: “blockchain”, “email”: “liz@lazarus.com”, “attributes”: { “custom:stateName”: “Colorado”, “custom:stateCode”: “05”, “custom:role”: “carrier”, “custom:organizationId”: “12345” } } ] } |
Analytics |
{ “users”: [ { “username”: “test_user1@regulator.com”, “password”: “<password>”, “familyName”: “test”, “givenName”: “user1”, “email”: “test_user1@regulator.com”, “attributes”: { “custom:stateName”: “Colorado”, “custom:stateCode”: “05”, “custom:role”: “regulator”, “custom:organizationId”: “colorado doi” } } ] } |
Carrier |
{ “users”: [ { “username”: “david@AAISonline.com”, “password”: “<password>”, “familyName”: “david”, “givenName”: “aais”, “email”: “david@AAISonline.com”, “attributes”: { “custom:stateName”: “Colorado”, “custom:stateCode”: “05”, “custom:role”: “stat-agent”, “custom:organizationId”: “12345” } } ] } |