2. Infrastructure as Code using Jenkins
2.1. Overview
This document describes the process of setting up an openIDL node using Infrastructure as a Code. This document details the process that involves automation pipelines prepared using Jenkins and its dependant platform. The following are the technology tools required.
GitHub
Jenkins
Terraform Cloud/Terraform Enterprise
AWS Cloud
Ansible Tower/AWX (Opensource)
NOTE: When setting up nodes, all nodes must use the same environment. It is not possible to connect with different environments. For example, a test carrier node cannot connect to a dev aais and analytics network.
Throughout this document you will find sections, sub sections, paragraphs or steps that apply to one or the other path. This will be designated with a if statement or a flag in the right part of the page.
2.1.1. Instructions
If you see a  then you will find a step in the iac-workbook.
2.2. Introduction
2.2.1. Architecture

2.2.2. High Level Workflow
The below are the stages required to complete to get the node up and running.
Prepare Amazon Web Services account
Prepare GitHub Repository
Prepare Terraform Cloud/Enterprise
Prepare Jenkins
Prepare Ansible Tower/AWX (open source version)
Deploy Base Infrastructure (AWS cloud)
Deploy Blockchain Network (New network/join existing network)
Deploy OpenIDL application
2.2.3. Configuration Worksheet
This section is pending…
2.3. Prepare Amazon Web Services Account
The AWS account needs to be prepared before the actual resources are deployed as a prerequisite.
 As a first step note down the aws account number as it will be used later
In this phase, the following steps are performed at high level.
Enable an IAM role with permission policy
Enable an IAM user
Enable trust policy
Prepare Cognito prerequisite
2.3.1. Setup IAM Role
Setup IAM Role for terraform
Login to AWS console using either a root account or IAM user with administrative rights
Go to IAM and go to roles under access management and click on create role
Select type of trusted entity as “AWS account”
Keep the default for the account.
Choose “Require external ID” and enter “terraform”. Then click “next”

Then click on create policy, select json and update the policy content with below policy to limit only necessary permissions for the IAM role to be used by terraform to manage AWS resources.
{
    "Version": "2012-10-17",
    "Statement": [
        {
            "Sid": "AllowServices",
            "Effect": "Allow",
            "Action": [
                "iam:*",
                "ec2:*",
                "s3:*",
                "cloudtrail:*",
                "cloudwatch:*",
                "logs:*",
                "ses:*",
                "cognito-idp:*",
                "eks:*",
                "kms:*",
                "dynamodb:*",
                "acm:*",
                "autoscaling:*",
                "elasticloadbalancing:*",
                "ebs:*",
                "route53:*",
                "route53domains:*",
                "sts:*",
                "secretsmanager:*",
                "cloudformation:ListStacks",
                "sns:*",
                "application-autoscaling:*",
                "lambda:*"
            ],
            "Resource": "*"
        }
    ]
}
Add necessary meaningful tags which are arbitrary for the policy
Example:
Owner = “”
Used_by = “terraform”
Application = “openidl”
Enter a name for the IAM policy, ex: tf_admin_policy and click on create policy to finish

Once the policy is created, go back to roles screen, and create the role again click refresh and select the named policy created in previous step and hit the refresh button.
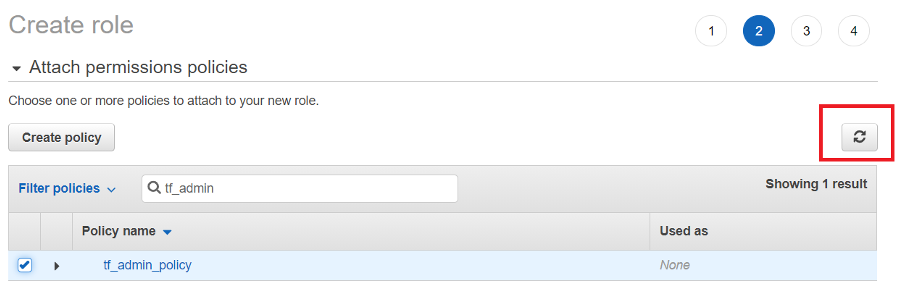
Add the necessary arbitrary tags to the IAM role this time and click Review
Enter role name, a description and ensure the policy is assigned as per below screen shot and click on create role to finish setting up IAM role with necessary policy required to manage AWS

Note down the IAM role ARN as it is required later
2.3.2. Setup IAM User with inline policy
Setup IAM user for terraform
Within IAM in AWS console go to users in access management and click on Add users
Enter a username and select AWS access type as “Programmatic access” and click next

Add user to specific group if applicable, otherwise key in tags and finish creating user
Note: Do not attach any IAM policy at this moment.
Create the user
Note the access key id and secret key
Then get back to users and open the created user, go to permissions and click on Add inline policy, click on json

Modify the below policy template by adding ARN of the IAM role created in previous step and the external id value set in previous step and click review policy “terraform” is the external id
{
    "Version": "2012-10-17",
    "Statement": [
        {
            "Action": [
                    "sts:AssumeRole",
                    "sts:TagSession"
            ],
            "Resource": "<AWS_IAM_ROLE_ARN>",
            "Effect": "Allow",
            "Condition": {
            "StringEquals": {
                    "sts:ExternalId": "<AWS_EXTERNAL_ID>"
                }
            }
        }
    ]
}
Finally name the inline policy and finish creating it. Use “tf_user_policy”.

Note down the IAM user access key and secret key
Note the IAM user ARN
2.3.3. Update IAM Role with Trust Policy
Update terraform IAM role trust policy
Finally, time to update the trust policy for the IAM role created in the previous step. So, within AWS console under IAM go to roles in access management, select the role created in previous step.
Go to trust relationships and click on Edit trust relationship
Now update the policy document using the below template with update on IAM user ARN and finish update trust policy
{
    "Version": "2012-10-17",
    "Statement": [
        {
        "Effect": "Allow",
        "Principal": {
            "AWS": "<IAM_USER_ARN>"
        },
        "Action": [
            "sts:AssumeRole",
            "sts:TagSession"
        ],
        "Condition": {
            "StringEquals": {
            "sts:ExternalId": "<AWS_EXTERNAL_ID>"
            }
        }
        }
    ]
}
External ID is from the first step of IAM. “terraform”
The external ID is additional security string used between IAM user and IAM role as a trust to allow permission.
Node down the external ID “terraform” as it is required later
Now we have completed the following steps
Created IAM role (ARN to be noted)
Assigned permission policy to manage AWS resources for the IAM role
Created IAM user
Created inline policy and assigned to IAM user to assume the IAM role previously created
Updated trust policy in IAM role to allow IAM user a permission to assume the role
2.3.4. Setup email identity and move SES out of sandbox for COGNITO
Cognito is a prerequisite for the node to setup and function. Cognito user pool is used and it allows users to self-sign in (self-register) using their email id. Hence during user self-sign in process, Cognito sends email to the user email address for verification.
These emails to users can be sent using Cognito default service or using AWS SES service.
Limitations:
Cognito default allows only 50 emails per day only
Based on requirement, the option of either default email service (COGNITO_DEFAULT) or SES service (DEVELOPER) shall be chosen
2.3.5. Option1: COGNITO_DEFAULT
1. In case, Cognito default is preferred, there are no actions in adding an email address and verifying it or moving SES service out of sandbox for production is required.
2. When Cognito default is chosen, set email_sending_account = “COGNITO_DEFAULT” while preparing variables set in Terraform Cloud/Enterprise. This section is covered later.
Set the below input variables as empty in variables set in Terraform Cloud/Enterprise as they are not applicable.
ses_email_identity = “” userpool_email_source_arn = “”
2.3.6. Option2: AWS SES Service (DEVELOPER)
The next option is enabling SES service for Cognito for sending emails. However Cognito supports using SES service only in the following regions for this purpose.
Hence for Cognito to work along with SES choose either one of the regions to configure SES.
Cognito supported SES regions:
us-west-1
us-west-2
us-east-1
2. In AWS console, choose one of the regions mentioned above, go to SES service select email addresses
Login to AWS console, go to simple email service in one of the regions and add the email address and click on verify a new email address

3. Enter an email address that would be used as an identity by Cognito in sending emails to users during self-sign up.

4. A verification email would be triggered to the email address that was added. Please login to the email account and complete email id verification.
- Then note down the ARN of the email address and the email address itself that was verified in SES as it is used later

6. Further go to email addresses and click on the email id that is added, then select Identity Policies and click on Create policy and select Custom Policy.

7. Edit the below policy and replace account number and email-id with the relevant values and add this policy statement to finish creating identity policy. This allows Cognito to use SES service to trigger emails upon user self-sign in to verify user identity.
{ “Version”: “2008-10-17”, “Statement”: [ { “Sid”: “stmnt1234567891234”, “Effect”: “Allow”, “Principal”: { “Service”: “cognito-idp.amazonaws.com” }, “Action”: [ “ses:SendEmail”, “ses:SendRawEmail” ], “Resource”: “arn:aws:ses:us-east-1:<aws_account_number>:identity/<emailid>” } ] } |

Finally refer the below link to move SES service out of sandbox for production use.
https://docs.aws.amazon.com/ses/latest/DeveloperGuide/request-production-access.html
2.4. Prepare GitHub repositories
Setup forked repository
If you don’t have an alternate organization into which you can fork the repositories, then create that now
Fork the respective repository and its mentioned branches as per the below table
Fetch the upstream for the respective branch and its relevant repository
2.4.1. Source code repositories (GitHub)
There are three public repositories that are used in the overall node setup.
No |
Repository |
Description |
URL and branch |
|---|---|---|---|
1 |
openidl-aais-gitops |
This is the key repository that is used in setting up the node. |
https://github.com/openidl-org/openidl-aais-gitops.git branch: develop-nginx-v1 |
2 |
openidl-main |
application codes are managed in this repository. Indirectly used in the pipelines |
https://github.com/openidl-org/openidl-main.git branch: develop |
3 |
openidl-etl |
There are lambda functions used and those code is located in this repository. Indirectly used. |
https://github.com/openidl-org/openidl-etl.git branch: develop |
Node down the repository URLs and the branches
Setup github user and personal access tokens
A user account with necessary permissions to manage these repositories is required. Further provision a Personal Access Token with Selected scopes as “repo”.
The following are the areas the token is used. A single PAT or multiple PAT can be provisioned and used according to each organization decisions. Either provision one or below listed number of tokens and use accordingly.
No |
PAT |
Description |
|---|---|---|
1 |
PAT 1 |
A personal access token which will be used by Jenkins to connect to GitHub. This token will be added as a username/password secret in Jenkins to allow it to connect to repositories successfully. |
2 |
PAT 2 |
A personal access token which will be used by AWX/Tower to connect to source control to sync project (playbooks). This will be added as a source control credential in AWX/Tower and further used to sync playbooks. |
3 |
PAT 3 |
A personal access token used by ansible playbooks to download content from the repository during playbook run on remote host. |
To provision PAT in GitHub (Source control) login to GitHub, go to settings => Developer settings => Personal access tokens => Generate new token.
Name the token, set expiration as either no expiration or required number of days if decided to refresh on a specific interval.
Set the selected scopes as “repo”

Note down the personal access tokens created and the github user account in which it is created for further use
2.4.2. Best practices to consider in setting up GitHub repository
Follow best practices in github
The below are best practices recommended in setting up a GitHub repository and for more details refer to GitHub documentation. However, these are only optional for enabling the pipeline.
Enable appropriate branch protection rules to manage who can push/pull to a branch
Enable required status checks, either strict or loose to have controlled updates to the branch
Configure how to merge based on requirements (Option A: Allow merge commits, Option B: Allow squash merging, Option C: Allow rebase merging)
Disable auto merge
Disable auto delete of head branch
Enable who can have access to repository
Enable branch protection by setting up
require pull requests review before merging,
require conversion resolution before merging
Protect who can push to branch directly
Setup notifications related to branch updates/changes
Setup artifact and log retention as per needs
Configure necessary secrets according to requirements at Organization, Environment or Repository level.
Setup Runner configuration - Allow select actions especially those created by GitHub and verified marketplace actions as below.
** The last step in enabling github actions is optional as and when Github actions pipeline are used, otherwise not applicable**

2.5. Prepare Terraform Cloud/Enterprise
Terraform Cloud or Terraform Enterprise are assumed to be setup. Please see your administrator for how to accomplish this.
The following are the configuration required to setup in Terraform cloud/enterprise instance.
User Token/Team Token
Workspaces
Variable Set
2.5.1. Terraform User/Team Token
Setup terraform token (either user or team)
A user token/team token is required to allow Jenkins to authenticate and successfully communicate with Terraform. It depends on an organization to choose between the type of token used according to their need.
2.5.1.1. TFC/TFE User Token
A user API token has the same permission level as your user account. It is the only type of token which can be granted access to multiple organizations.
Login to Terraform Cloud/Enterprise go to User settings
Create an API token
2.5.1.2. TFC/TFE Team Token
A team is suppose to be created before creating a team token. Refer to terraform cloud/enterprise documentation on setting up a team. Team API tokens are used by services, for example a CI/CD pipeline to perform plans and applies on a workspace. This is the preferred choice.
Login to Terraform Cloud/Enterprise, go to Organization settings
Go to Teams to setup up a new team and provision a team token or go to existing team and provision a team API token.
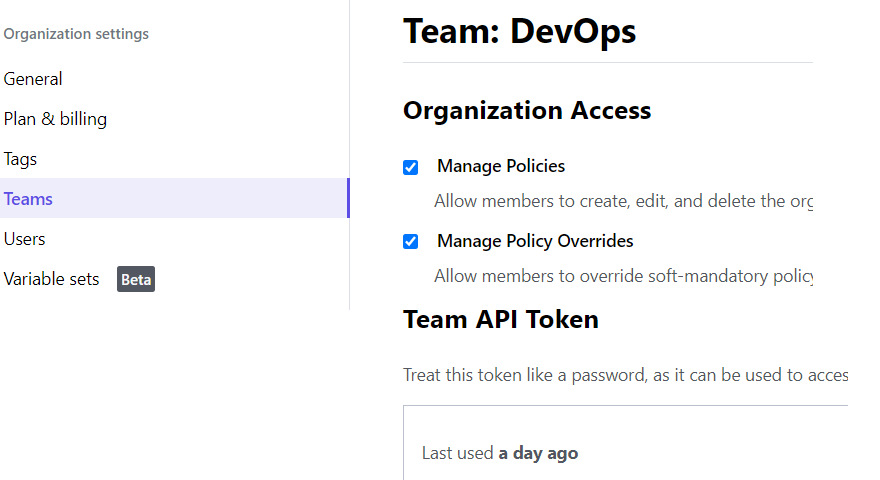
Note down the token
2.5.2. Workspaces
Setup terraform workspaces
The terraform code to provision necessary Infrastructure resources for OpenIDL node is provisioned into two independent sets. The first set is used to provision AWS resources and the other one to provision K8s resources. There is a dependency in provisioning K8s which are addressed in the first set of code and before provisioning K8s.
For example, K8s resources like config-map, storage class and ha proxy have dependencies with the EKS cluster which gets provisioned before these resources. Hence two sets of code are managed which requires two different terraform workspaces in the environment to manage and configure. The details are below.
2.5.2.1. Workspace to manage K8S Resources
Create K8S Workspace
A workspace to manage K8s resources is required. Create a new workspace and choose workflow as “API-Driven workflow” and give a meaningful name. Like <org name>-k8s-workspace
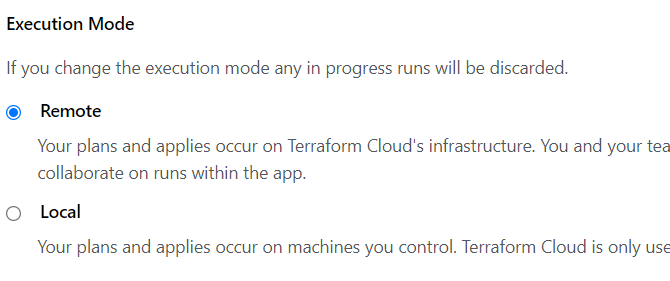
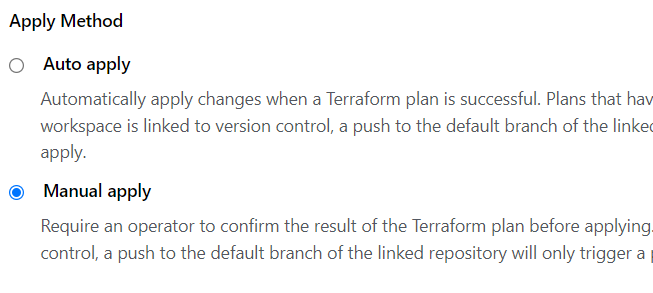
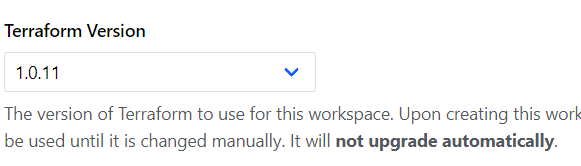
Open the workspace go to settings => General and set the execution mode to Remote, Apply method as Manual and Terraform version above 1.1.2
Note: This workspace refers to the state file of AWS resources workspace.
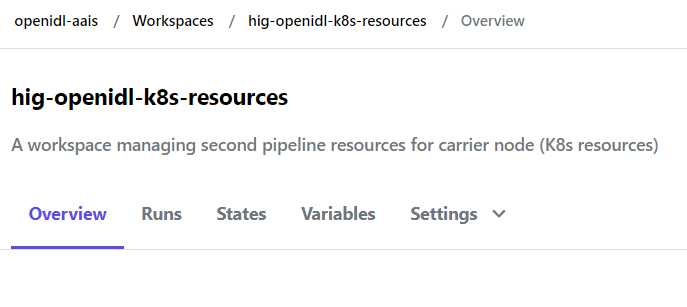
Note down the workspace name created to manage K8s resources
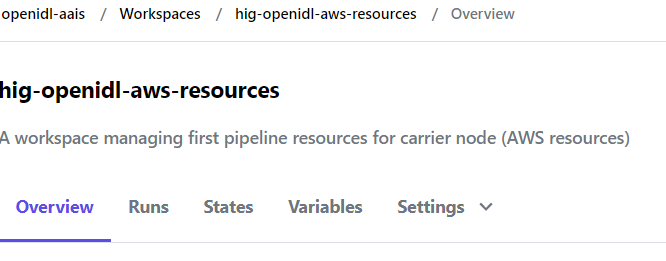
2.5.2.2. Workspace to manage AWS Resources
Create AWS Workspace
A workspace to manage AWS resources is required. Create a new workspace and choose workflow as “API-Driven workflow” and give a meaningful name. Like <org name>-aws-workspace
Open the workspace go to settings => General and set the execution mode to Remote, Apply method as Manual and Terraform version above 1.1.2
And finally, allow the state file of this workspace is accessible to the workspace used to manage K8s resources.
Note:This workspace shares its state file with K8s resources workspace

Note down the workspace name created to manage AWS resources
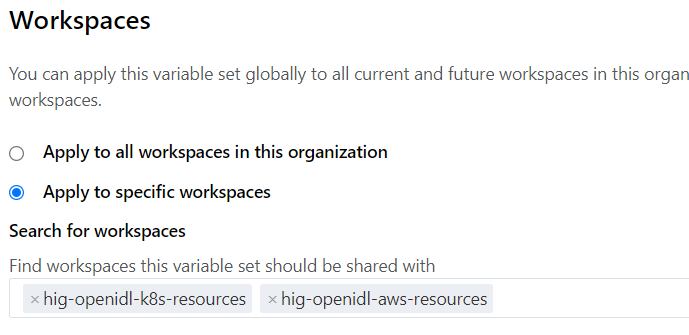
2.5.3. Variable Set
Setup terraform variables set
All the terraform variables and their values (including sensitive and non-sensitive) are added in a variable set. The details of actual variables and samples can be referred in the repository openidl-aais-gitops under directory “aws/templates”.
All the variables in the templates are required to add in the variable set. The detailed description of the variable’s significance is documented the templates directory in the repository.
The variable set is preferred as it can be shared across workspaces which is the typical use case in our solution. Configure variable set and share them across the workspace’s setup in previous section.
NOTE: When you are entering variables, in case of complex data types like maps, lists etc, follow HCL format and ensure the checkbox HCL is checked. Please refer to the below link and section “variable values and format”
https://www.terraform.io/cloud-docs/workspaces/variables/managing-variables

Refer to this spreadsheet that details the list of variables and its details to help populate variable set.
Use this TerraformVariables to prepare variable set in terraform cloud/enterprise.
2.5.4. Team Access
Enable team access to the workspaces (applicable when teams and its token used)
Finally in each workspace configured enable team access in case team token is chosen as preferred method for API access.

2.5.5. Terraform code changes to adapt to Terraform Cloud/Enterprise
Update terraform code to support Terraform Cloud/Enterprise as backend
Finally update the terraform code to support Terraform Cloud/Enterprise as backend for state management. Ensure that the code is updated as below before using to provision resources in the pipeline.
Activate the right AWS provider configuration in the code for aws_resources code set. |image5|
Comment the terraform backend section of the code in both aws_resources and k8s_resources code set in the file main.tf. Below is an example.

Activate the AWS provider configuration as below for k8s_resources code set and for remaining providers like Kubernetes and helm requires no changes.

Finally update/activate the code relevant code snippet as below for data.tf in k8s_resources code set.

Finally ensure that the updated code is pushed to the repository.
2.6. Prepare Jenkins
It is assumed that Jenkins exist in the environment, if not refer to jenkins documentation to setup an instance in the network.
When the jenkins instance is up and running below are the configuration required to complete.
Plugins
Node labels
Global tools configuration
Configure System – Ansible Tower/AWX
Credentials
2.6.1. Plugins required
Enable required jenkins plugin
The following are the additional plugins required to enable other than standard plugins which are installed during initial Jenkins’s setup.
HTTP Request Plugin
Source Code Plugin (Git Plugin)
Ansible Tower Plugin
AnsiColor

2.6.2. Node labels
Label jenkins node
The Jenkins pipeline job uses a node label “openidl”. Do either of the one to setup a node with relevant label.
Option 1: Setup “openidl” as node lable to existing node
Option 2: Setup a new node and label it as “openidl”
Option 3: Identify existing nodes in the environment and identify the label set. Then update the Jenkins pipeline code with that label to align code with the environment.
The steps to labeling a node is skipped as it can be handled by Jenkins’s administrator.
In case chosen to update the pipeline code with relevant node label. Refer to the pipeline code to the following section and replace “openidl” with custom label.
Go to the repository openidl-aais-gitops and to the folder Jenkins-jobs/. For each job code, update as required.
node { label “openidl” } |
node(‘openidl’) |
|---|---|
2.6.3. Global tools configuration
setup global tools configuration
Go to Jenkins => Mange Jenkins => Global Tool Configuration
Ensure Git and Terraform are configured according to your environment
Note the command shown here works for Ubuntu node and for Linux it will be different. Hence configure Git according to your nodes operating system.
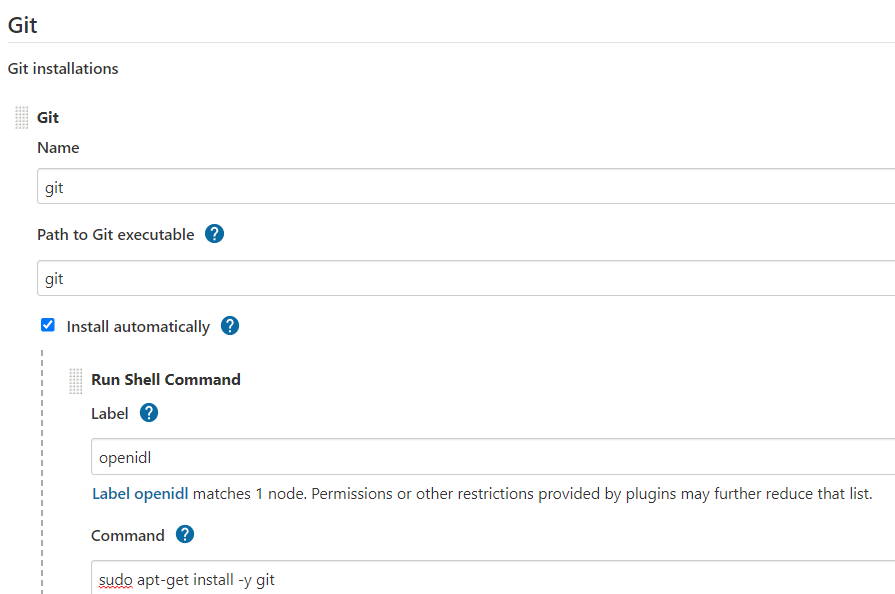
tool home should be ‘/usr/bin/git’
2.6.4. Configure System (AWX/Ansible Tower)
configure Ansible Tower plugin in Jenkins for integration between them
Go to Jenkins => Manage Jenkins => Configure System
Go to Ansible Tower
Click on Add, Give a name to the instance “AWX”. Please note “AWX” instance name is used in Jenkins’s pipeline code. In case a different name is used, the pipeline code needs to be updated.
Update the actual URL of Ansible Tower/AWX instance to make API calls
Include the username/password to authenticate Jenkins in AWX/Tower. Hence get the user first created in AWX/Tower and get that credential added in Jenkins as username/password credential type before setting this up. Refer to the AWX preparation section on how to setup user account.
During development instance SSL is not used, however in production environment SSL should be enabled which is not documented here, refer to relevant Jenkins’s documentation on enabling SSL.
Test the connection between Jenkins and Ansible is successful to proceed further.

2.6.5. Credentials
Finally create credentials and enter the secrets used in the pipelines/integrations
The following are the listed credentials are required to create in Jenkins. Refer to example of username and password kind and secret text type to provision the three credentials in Jenkins.
No |
Purpose |
Cred Type |
Description |
|---|---|---|---|
1 |
Jenkins access to AWX |
Username and Password |
An AWX user account having permissions to run jobs, access required credentials, project, and resources. A username and password are used. Setup an acc in Ansible Tower and key in. Refer to Ansible Tower section. |
2 |
Jenkins access to GitHub (source control) |
Username and Password (PAT) |
GitHub username and Personal Access Token. This is used by Jenkins to work with source control. Refer to tokens created previously. |
3 |
Jenkins access to Terraform Cloud/ Enterprise |
Secret Text |
A User/team token created in Terraform Cloud/Enterprise. Get that added as secret text in Jenkins. Refer to token created previously. |
2.6.5.1. Username and Password Type
Login to Jenkins go to Manage Jenkins => Manage Credentials => Stores scoped to Jenkins (Jenkins) => Global Credentials (unrestricted) => Add credentials
Then choose Kind as “Username Password” and key in username, Password, Description and a unique ID which would be referred in the pipeline code. (An example below)

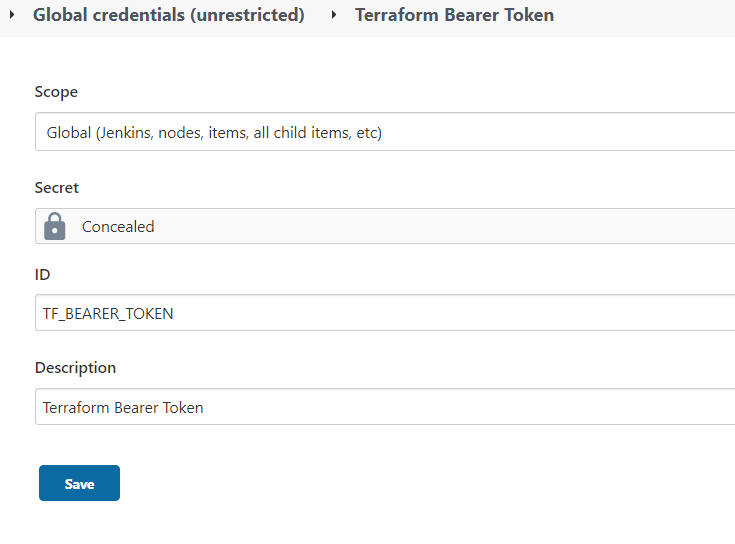
2.6.5.2. Secret Text Type
Login to Jenkins go to Manage Jenkins => Manage Credentials => Stores scoped to Jenkins (Jenkins) => Global Credentials (unrestricted) => Add credentials
Choose Kind as secret text, enter secret text like Token in “secret” field and name the secret ID as unique since it will be used in pipeline code. (An example below)

2.7. Jenkins Jobs Configuration
2.7.1. Credentials
Before configuring Jenkins’s job ensure that the required credentials relevant to the jobs are already configured in Jenkins.
Terraform credentials
AWX (Ansible Tower/AWX User credentials)
GitHub User credentials
No |
Cred Type |
ID |
Username |
Password |
Descr |
|---|---|---|---|---|---|
1 |
Username with password |
openidl-a ais-gitops |
GitHub account username |
Personal access token created |
GitHub credentials |
2 |
Username with password |
AWX |
Ansible tower username |
Ansible tower user password |
Ansible Tower/AWX credentials |
3 |
Secret text |
TF_BE ARER_TOKEN |
NA |
Terraform user/team API token |
Terraform Cloud /Enterprise access token |
References: GitHub credential

References: AWX credential

References: Terraform credential
2.7.2. Job Configurations
Configure Jenkins pipeline jobs
The list of jobs to be configured are
Job to provision AWS resources and K8s resources using Terraform Cloud/Enterprise
Job to provision Vault using Ansible Tower/AWX
Job to provision Blockchain Network using Ansible Tower/AWX
Job to provision MongoDB using Ansible Tower/AWX
Job to provision OpenIDL application secrets and application using Ansible Tower/AWX
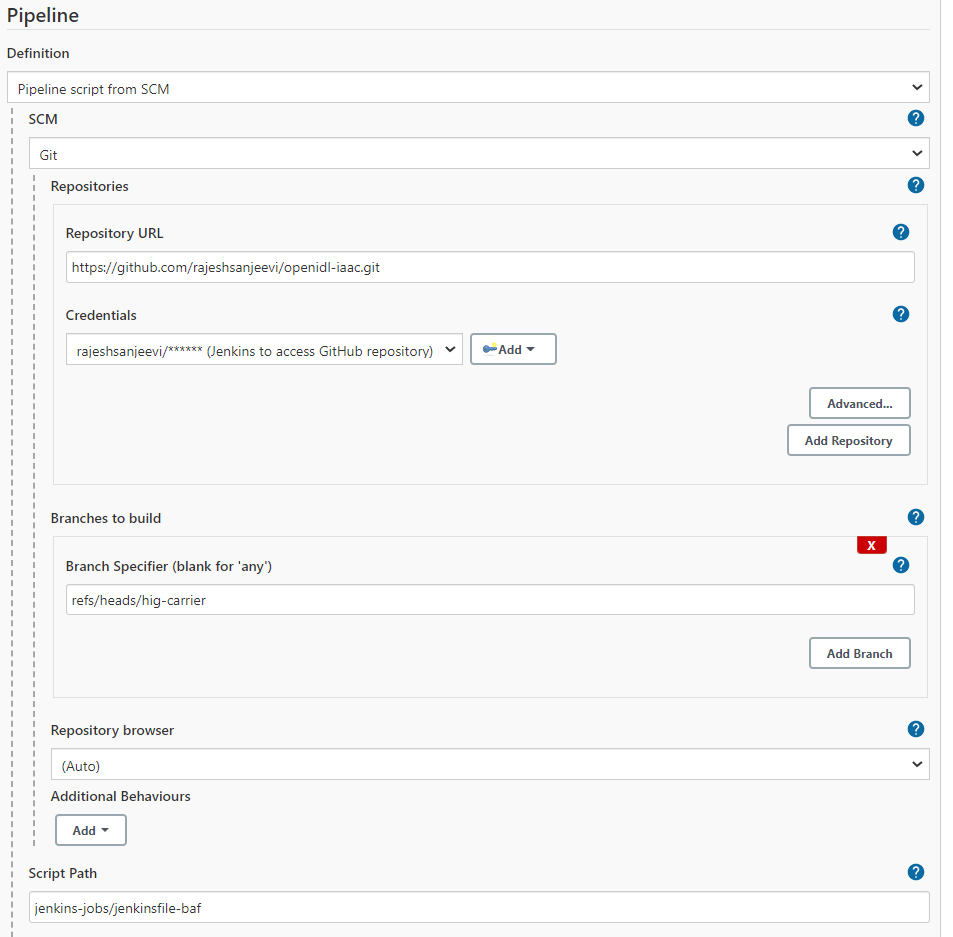
2.7.2.1. Terraform Job
Go to Jenkins => New Item => Give a meaningful name
Select Job type as PIPELINE and proceed next
Give a description to the job and move to pipeline section
Select Definition as Pipeline Script from SCM
Select SCM as Git
Key in the Infrastructure code repository (openidl-aais-gitops) url.
Select the GitHub credentials
Specify the relevant branch “refs/heads/<branch-name>”.
Set script path to “Jenkins-jobs/jenkinsfile-tf”.

2.7.2.2. Vault Job
Go to Jenkins => New Item => Give a meaningful name
Select Job type as PIPELINE and proceed next
Give a description to the job and move to pipeline section
Select Definition as Pipeline Script from SCM
Select SCM as Git
Key in the Infrastructure code repository (openidl-aais-gitops) url.
Select the GitHub credentials
Specify the relevant branch “refs/heads/<branch-name>”.
Set script path to “Jenkins-jobs/jenkinsfile-vault”.

2.7.2.3. Blockchain Network Job
Go to Jenkins => New Item => Give a meaningful name
Select Job type as PIPELINE and proceed next
Give a description to the job and move to pipeline section
Select Definition as Pipeline Script from SCM
Select SCM as Git
Key in the Infrastructure code repository (openidl-aais-gitops) url.
Select the GitHub credentials
Specify the relevant branch “refs/heads/<branch-name>”.
Set script path to “Jenkins-jobs/jenkinsfile-baf”.
2.7.2.4. MongoDB Job
Go to Jenkins => New Item => Give a meaningful name
Select Job type as PIPELINE and proceed next
Give a description to the job and move to pipeline section
Select Definition as Pipeline Script from SCM
Select SCM as Git
Key in the Infrastructure code repository (openidl-aais-gitops) url.
Select the GitHub credentials
Specify the relevant branch “refs/heads/<branch-name>”.
Set script path to “Jenkins-jobs/jenkinsfile-mongodb”.

2.7.2.5. OpenIDL Application Job
Go to Jenkins => New Item => Give a meaningful name
Select Job type as PIPELINE and proceed next
Give a description to the job and move to pipeline section
Select Definition as Pipeline Script from SCM
Select SCM as Git
Key in the Infrastructure code repository (openidl-main) url.
Select the GitHub credentials
Specify the relevant branch “refs/heads/<branch-name>”.
Set script path to “Jenkins-jobs/jenkinsfile-apps-secrets”.

2.8. Prepare Ansible Tower/AWX
The following configuration items are required to setup in Ansible for the pipelines to work.
An User Account
Credential Types
Inventory, Group and Host
Credentials
Projects
Templates
2.8.1. User Account
An user account for jenkins to make API calls to Ansible
A user account to allow Jenkins to successfully work with Ansible Tower/AWX API. The user should have necessary permissions to run jobs and its relevant objects. In development used system administrator type, however in production use role-based access control using teams/roles.

Note down the username and password created
2.8.2. Credential Types
Custom credential types for openidl project specific in ansible
For the OpenIDL deployment there are infrastructure and application related pipelines. They require specific credentials and additional variables. Hence custom credential types are used to simply the setup. The following are the credential types and steps to configure them.
OpenIDL-IAC => Used in infrastructure provisioning jobs
OpenIDL-APP => Used in application deployment jobs
OpenIDL-IAC-AWSUser-BAF => AWS IAM user credentials used with Blockchain automation jobs
2.8.2.1. OpenIDL-IAC
Login into Ansible Tower/AWX instance, Go to Administration
Go to Credential Types
Click on Add
4. Name it as OpenIDL-IAC and paste the below configuration in each relevant section.
Input Configuration
fields:
required:
|
|---|
Injector Configuration
extra_vars: aws_region: ‘{{ aws_region }}’ aws_iam_role: ‘{{ aws_iam_role }}’ aws_access_key: ‘{{ aws_access_key }}’ aws_secret_key: ‘{{ aws_secret_key }}’ baf_image_repo: ‘{{ baf_image_repo }}’ aws_external_id: ‘{{ aws_external_id }}’ gitops_repo_url: ‘{{ gitops_repo_url }}’ app_cluster_name: ‘{{ app_cluster_name }}’ blk_cluster_name: ‘{{ blk_cluster_name }}’ gitops_repo_user: ‘{{ gitops_repo_user }}’ aws_account_number: ‘{{ aws_account_number }}’ gitops_repo_branch: ‘{{ gitops_repo_branch }}’ gitops_repo_user_email: ‘{{ gitops_repo_user_email }}’ gitops_repo_user_token: ‘{{ gitops_repo_user_token }}’ |
|---|
Save and close, screenshot below.

2.8.2.2. OpenIDL-IAC-AWSUser-BAF
Similarly repeat the above steps to setup this credential type as well.
Input Configuration
fields:
required:
|
|---|
Injector Configuration
extra_vars: baf_user_access_key: ‘{{ baf_user_access_key }}’ baf_user_secret_key: ‘{{ baf_user_secret_key }}’ baf_user_external_id: ‘{{ baf_user_external_id }}’ baf_user_assume_role_arn: ‘{{ baf_user_assume_role_arn }}’ |
|---|

2.8.2.3. OpenIDL-APP
Similarly repeat the above steps to setup this credential type as well.
Input Configuration
fields:
required:
|
|---|
Injector Configuration
extra_vars: aws_region: ‘{{ aws_region }}’ aws_iam_role: ‘{{ aws_iam_role }}’ gitrepo_name: ‘{{ gitrepo_name }}’ aws_access_key: ‘{{ aws_access_key }}’ aws_secret_key: ‘{{ aws_secret_key }}’ gitrepo_branch: ‘{{ gitrepo_branch }}’ aws_external_id: ‘{{ aws_external_id }}’ app_cluster_name: ‘{{ app_cluster_name }}’ gitrepo_password: ‘{{ gitrepo_pat }}’ gitrepo_username: ‘{{ gitrepo_username }}’ vault_secret_name: ‘{{ vault_secret_name }}’ |
|---|

Note down the credential types created
2.8.3. Inventory, Group and Host
Setting up hosts/groups in ansible inventory
The OpenIDL ansible playbooks use the inventory group “ansible_provisioners” and a localhost. Hence setup the relevant inventory, its group and host details in Ansible Tower/AWX.
Login to the instance, go to Resources => Inventories => Add
Name it as “ansible_provisioners and save.

Now open the created inventory and go to Groups and click on Add
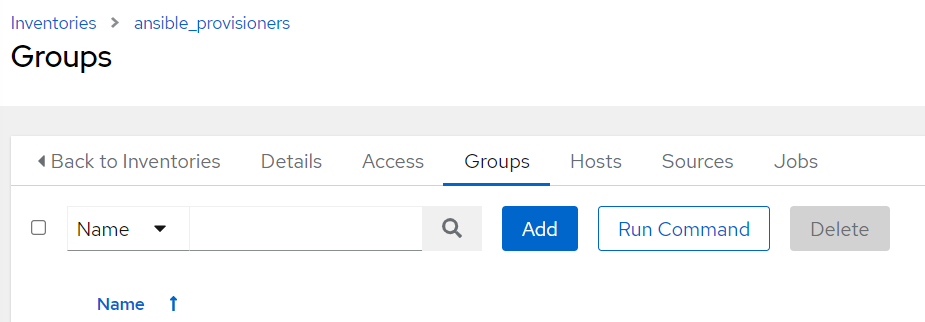
Name the group as “ansible_provisioners”.

Now go to inventory ansible_provisioners and then go to Hosts and click on Add to include localhost part of the group.
Note localhost is by default added to the inventory file part of playbook configuration in the repository. In case chosen to use alternate node then ensure that the relevant node is added to the ansible_provisioners group/inventory and further the same host information is added to the inventory file located in the path “awx-automation/inventory/ansible_provisioners” file in the github repositories as well. For example, below.
This entry should be added to both the repositories. (app and infra).

2.8.4. Credentials
Setup credentials that will be used for authentication in jobs
The following are the credentials to be configured in Ansible Tower/AWX.
Machine credential
Source Control credential
OpenIDL-IAC
OpenIDL-APP
OpenIDL-IAC-AWSUser-BAF
2.8.4.1. Machine Credential
This credential is used by the playbook to authenticate a host to run the playbooks. It may be either a localhost or remote node. This is a system SSH credential configured to allow Ansible instance to access a host to run the playbook.
First ensure the host (localhost/remotehost) is configured such access and further the credential is added here.
Go to Ansible instance => Resource => Credentials and add.
Ensure the credential type chosen is Machine
Enter a name, Input username of the account and add private key of the SSH key pair which is configured in the system and also enable privilege escalation method as sudo.
Note that in development an account “ansible” is used with sudo permissions. The account can be adjusted with permissions carefully reviewing the playbook actions and relevant permissions only to allow sudo commands.
Note down the credential
2.8.4.2. Source Control Credential
Similarly create a credential of type source control to enter GitHub user credential (username and PAT) to allow Ansible to successfully work with repositories. The screenshot for reference.
Name the credential
Select Type as Source Control
Enter the GitHub username and Personal Access Token (alternate is to use SSH method)

Note down the credential
2.8.4.3. OpenIDL-IAC
The next step is to use credential of type OpenIDL-IAC. This will be used by infrastructure jobs. A reference screenshot and significance of each field is detailed in below table.
However the values for all the fields would not be readily available as the
AWS infrastructure is not provisioned yet. Hence fill up dummy values which are unknown
at the moment and later it can be populated before executing the relevant pipeline jobs.

S N o |
Key |
Description |
|---|---|---|
1 |
Credential Type |
Select type OpenIDL-IAC |
2 |
AWS access key |
AWS access key of GitHub actions IAM user provisioned |
3 |
AWS secret key |
AWS secret key of GitHub actions IAM user provisioned |
4 |
AWS IAM role |
AWS IAM role provisioned to be assumed by GitHub actions IAM user |
5 |
AWS external id |
“git-actions” by default |
6 |
AWS region |
AWS region in which resources are provisioned |
7 |
AWS account number |
AWS account number |
8 |
BAF image repository |
The repository in which Docker image for Blockchain Automation Framework is located. Presently this is public repository. |
9 |
Blockchain cluster name |
Name of the cluster provisioned for blockchain resources |
10 |
Application cluster name |
Name of the cluster provisioned for application resources |
11 |
Gitops repository URL |
GitHub repository URL in which infrastructure code is located |
12 |
Gitops repository branch |
GitHub repository branch to be used |
13 |
GitOps repository user |
Username has access to the repository |
14 |
Gitops repository user PAT |
Personal access token of the user to authenticate with GitHub to use with ansible playbooks |
15 |
Gitops repository user email |
User email ID of the GitHub repository user used |
Note down the credential
2.8.4.4. OpenIDL-APP
Create the credential of type OpenIDL-APP as described below which will be used by jobs related to OpenIDL application.
However the values for all the fields would not be readily available as the
AWS infrastructure is not provisioned yet. Hence fill up dummy values which are unknown
at the moment and later it can be populated before executing the relevant pipeline jobs.

S N o |
Key |
Description |
|---|---|---|
1 |
Credential Type |
OpenIDL-APP |
2 |
AWS access key |
AWS access key of GitHub actions IAM user provisioned |
3 |
AWS secret key |
AWS secret key of GitHub actions IAM user provisioned |
4 |
AWS IAM role |
AWS IAM role provisioned to be assumed by GitHub actions IAM user |
5 |
AWS external id |
“git-actions” by default |
6 |
AWS region |
AWS region in which resources are provisioned |
7 |
Git Repository |
GitHub repository related to applications |
8 |
Git branch name |
Name of the GitHub branch |
9 |
Gitrepo username |
Email id of the GitHub user used |
10 |
Gitrepo PAT |
Personal access token created previously to use with ansible playbooks |
11 |
Application cluster name |
Application cluster name |
12 |
Vault Secret name |
Secret created in AWS secret manage which holds credentials of vault. The standard format is <orgname>-<env>-config-vault |
Note down the credential
2.8.4.5. OpenIDL-IAC-AWSUser-BAF
Finally, provision credential of type OpenIDL-IAC-AWSUser-BAF. Choose the relevant credential type, key in AWS access key, secret key, external_id and baf user assume role arn of AWS IAM user provisioned related to BAF.
However the values for all the fields would not be readily available as the
AWS infrastructure is not provisioned yet. Hence fill up dummy values which are unknown
at the moment and later it can be populated before executing the relevant pipeline jobs.

Note down the credential
2.8.5. Projects
Setup projects
The next step is to configure projects which is used to pull the ansible playbook contents from GitHub to ansible tower/AWX.
openidl-aais-gitops
2.8.5.1. openidl-aais-gitops
Repeat the same above steps to configure project for infrastructure code.

**Note down the project name”
2.8.6. Templates
Setup ansible job templates
It is time to configure ansible job templates in Ansible Tower/AWX. The following are the list of job templates required to configure.
Vault install
MongoDB install
Blockchain install
Register Users (BAF preregister users)
OpenIDL application secrets install
OpenIDL application install
2.8.6.1. Vault Install
Login to Ansible Tower/AWX, Go to Resources => Templates => Add
Key in Job name. The format is <org_name>-<env>-openidl-vault.
Org_name: First 4 characters of org_name. Note Jenkins pipeline code refers to the job template name and hence it is vital.
Env: dev | test | prod
Select Job type as Run and check on Prompt on Launch
Choose inventory as ansible_provisioners which was configured in previous step.
Choose the project that holds the IaC code. (openidl-aais-gitops) configured in previous step
Choose the relevant execution environment
Choose the playbook “awx-automation/vault.yml”.
Choose the following credentials.
Machine credential configured in previous step
OpenIDL-IAC credential configured in previous step
Choose prompt on Launch for variables (mandatory)
Set relevant verbosity level, Timeout at minimum 1800 seconds.
Set the Option “Privilege Escalation”.
2.8.6.2. MongoDB Install
Login to Ansible Tower/AWX, Go to Resources => Templates => Add
Key in Job name. The format is <org_name>-<env>-openidl-mongodb.
Org_name: First 4 characters of org_name. Note Jenkins pipeline code refers to the job template name and hence it is vital.
Env: dev | test | prod
Select Job type as Run and check on Prompt on Launch
Choose inventory as ansible_provisioners which was configured in previous step.
Choose the project that holds the IaC code. (openidl-aais-gitops) configured in previous step
Choose the relevant execution environment
Choose the playbook “awx-automation/mongodb.yml”.
Choose the following credentials.
Machine credential configured in previous step
OpenIDL-IAC credential configured in previous step
Choose prompt on Launch for variables (mandatory)
Set relevant verbosity level, Timeout at minimum 1800 seconds.
Set the Option “Privilege Escalation”.

2.8.6.3. Blockchain install
Login to Ansible Tower/AWX, Go to Resources => Templates => Add
Key in Job name. The format is <org_name>-<env>-openidl-baf.
Org_name: First 4 characters of org_name. Note Jenkins pipeline code refers to the job template name and hence it is vital.
Env: dev | test | prod
Select Job type as Run and check on Prompt on Launch
Choose inventory as ansible_provisioners which was configured in previous step.
Choose the project that holds the IaC code. (openidl-aais-gitops) configured in previous step
Choose the relevant execution environment
Choose the playbook “awx-automation/fabric-network.yml”.
Choose the following credentials.
Machine credential configured in previous step
OpenIDL-IAC credential configured in previous step
OpenIDL-IAC-AWSUser-BAF configured in previous step
Choose prompt on Launch for variables (mandatory)
Set relevant verbosity level, Timeout at minimum 0 seconds.
Set the Option “Privilege Escalation”.

2.8.6.4. Register Users
Login to Ansible Tower/AWX, Go to Resources => Templates => Add
Key in Job name. The format is <org_name>-<env>-openidl-register-users
Org_name: First 4 characters of org_name. Note Jenkins pipeline code refers to the job template name and hence it is vital.
Env: dev | test | prod
Select Job type as Run and check on Prompt on Launch
Choose inventory as ansible_provisioners which was configured in previous step.
Choose the project that holds the IaC code. (openidl-aais-gitops) configured in previous step
Choose the relevant execution environment
Choose the playbook “awx-automation/pre-register-users.yml”.
Choose the following credentials.
Machine credential configured in previous step
OpenIDL-IAC credential configured in previous step
Choose prompt on Launch for variables (mandatory)
Set relevant verbosity level, Timeout at minimum 900 seconds.
Set the Option “Privilege Escalation”.


2.8.6.5. OpenIDL Application Install
Login to Ansible Tower/AWX, Go to Resources => Templates => Add
Key in Job name. The format is <org_name>-<env>-openidl-apps
Org_name: First 4 characters of org_name. Note Jenkins pipeline code refers to the job template name and hence it is vital.
Env: dev | test | prod
Select Job type as Run and check on Prompt on Launch
Choose inventory as ansible_provisioners which was configured in previous step.
Choose the project that holds the application code. (openidl-main) configured in previous step
Choose the relevant execution environment
Choose the playbook “awx-automation/deploy-openidl-apps.yaml”.
Choose the following credentials.
Machine credential configured in previous step
OpenIDL-APP credential configured in previous step
Choose prompt on Launch for variables (mandatory)
Set relevant verbosity level, Timeout at minimum 900 seconds.
Set the Option “Privilege Escalation”.

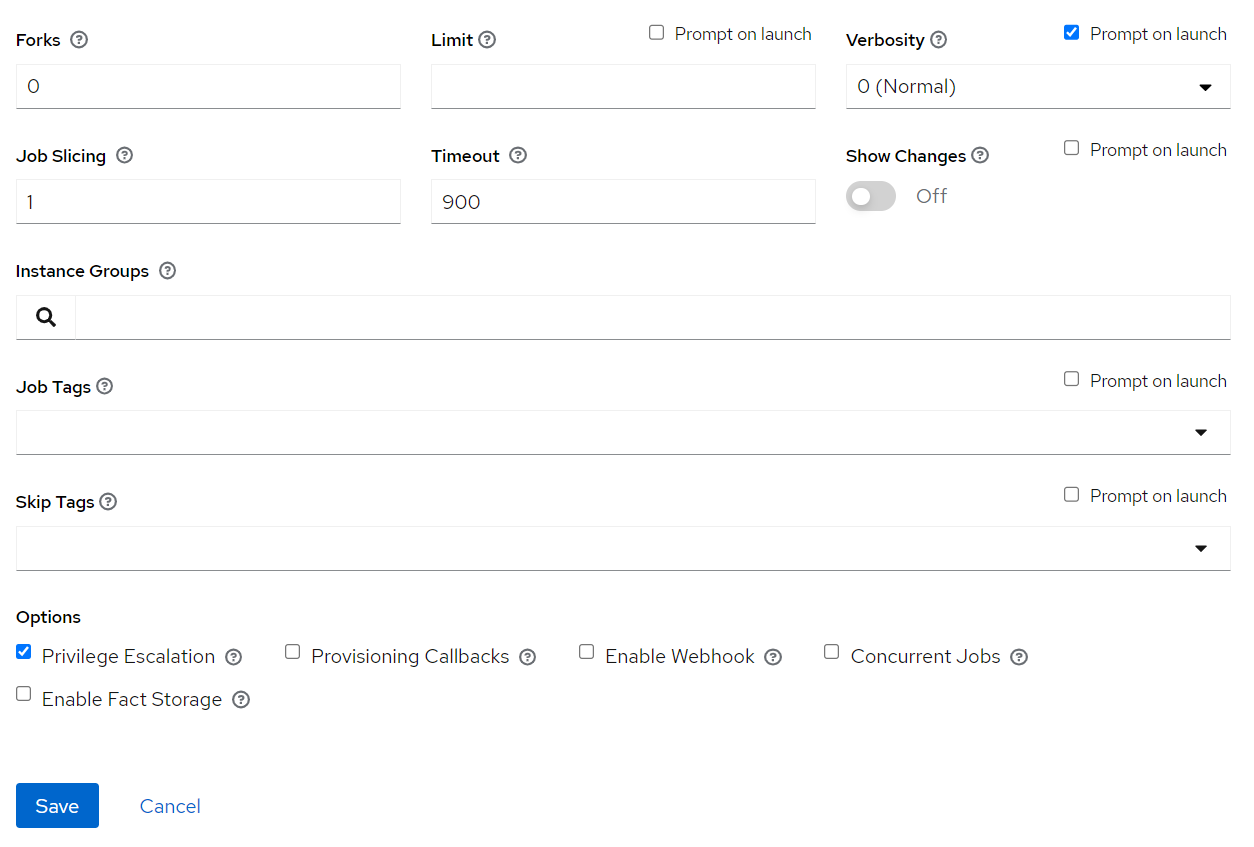
2.8.6.6. OpenIDL Application Secrets Install
Login to Ansible Tower/AWX, Go to Resources => Templates => Add
Key in Job name. The format is <org_name>-<env>-openidl-secrets
Org_name: First 4 characters of org_name. Note Jenkins pipeline code refers to the job template name and hence it is vital.
Env: dev | test | prod
Select Job type as Run and check on Prompt on Launch
Choose inventory as ansible_provisioners which was configured in previous step.
Choose the project that holds the application code. (openidl-main) configured in previous step
Choose the relevant execution environment
Choose the playbook “awx-automation/deploy-openidl-secrets.yaml”.
Choose the following credentials.
Machine credential configured in previous step
OpenIDL-APP credential configured in previous step
Choose prompt on Launch for variables (mandatory)
Set relevant verbosity level, Timeout at minimum 900 seconds.
Set the Option “Privilege Escalation”.
2.8.7. Summary
At this stage the preparation phase is completed in getting the below technology tools and environment readiness.
Sourcecode repositories
AWS account
Terraform Cloud/Enterprise
Jenkins
Ansible Tower/AWX
The next stage is the deployment phase in preparing base infrastructure, setting up blockchain network and deploying openidl application.
2.9. Deploy Base Infrastructure in AWS Cloud
Since the preparation phase is completed, the next phase is deployment in which getting the jenkins pipelines executed to provision the following.
Base infrastructure deployment in AWS cloud (uses Terraform/Jenkins)
Vault deployment (uses Jenkins/Ansible)
Blockchain deployment (uses Jenkins/Ansible)
MongoDB deployment (uses Jenkins/Ansible)
OpenIDL application secrets deployment (uses Jenkins/Ansible)
OpenIDL application deployment (uses Jenkins/Ansible)
The following section describes how to prepare and execute each Jenkins job to provision on the node. Let us first focus on deploying base infrastructure in AWS cloud.
Base infrastructure preparation
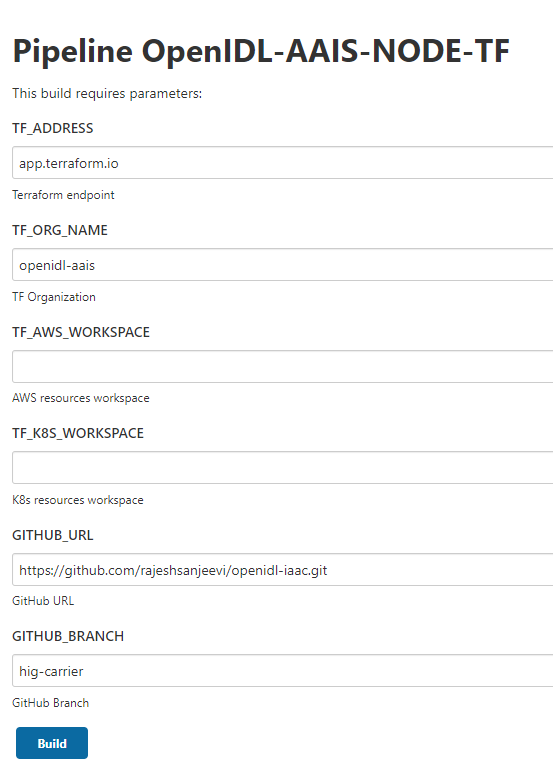
2.9.1. Executing Jenkins pipeline to provision AWS resources using Terraform Cloud
Provision AWS resources using Jenkins/Terraform pipeline
This is the job previously setup. It is used to provision AWS resources and K8s resources. Before triggering the pipeline ensure that the following are already setup as documentation in previous section.
Terraform Cloud/Enterprise (Workspaces, VariableSet, API Token)
Jenkins (Credentials, Job configuration)
Terraform code changes and pushed to repository
First run after configuring the job is dummy run as the option
shows as “Build Now”. This will fail and will update your job with
relevant parameters required for the job to run. Further runs will show
an option Build with Parameters which will be right run.
To trigger the job, go to Jenkins => relevant job (terraform) => Build with Parameters.
Enter the values to the inputs as listed below.
Field |
Description |
|---|---|
TF_ADDRESS |
Terraform Cloud/Enterprise endpoint |
TF_ORG_NAME |
Organization name setup in Terraform |
T F_AWS_WORKSPACE |
Terraform workspace name setup specifically for AWS resources |
T F_K8S_WORKSPACE |
Terraform workspace name setup specifically for K8s resources |
GITHUB_URL |
GitHub repository to check out the code |
GITHUB_BRANCH |
GitHub branch specifically to check out the code |
The job runs terraform plan and asks manual confirmation before running terraform apply. This job will run first to provision AWS resources and further run for K8s resources. Hence twice it asks input to confirm before performing terraform apply.
NOTE:
It is noticed that sometimes the request to upload configuration data (git repository content) to Terraform fails with below HTTP error 422. In case when you see the pipeline failed with this error, rerun the pipeline which will help.
Status |
Response |
Reason |
|---|---|---|
422 |
JSON API error object |
Malformed request. |
Once the AWS resources are provisioned successfully, carefully review the resources provisioned and perform the below actions.
2.9.2. Disable access keys and setup new access keys
Disable existing keys, create new keys and note down credentials for next stage
The terraform pipeline provisions three vital AWS IAM user resources. As this is provisioned part of terraform these user access and secret keys are in terraform state file.
The initial provisioned access keys and secret keys should not be used, and it should be set as INACTIVE(Do not delete them). Further create new access keys and secret keys for these users and use them.
NOTE: The name of the user has the first part truncated from the org_name. That is “carrier” becomes “carr-dev-baf-automation” which could cause a problem during testing if creating more than one carrier.
Note down the access keys and secret keys of the IAM users. Also note down the IAM roles that these users will assume.
Refer to inline policy of the users to identify the same if required
2.9.3. Remove security rule created by Kubernetes NGINX proxy deployment
Remove mentioned security group rules
Once AWS resources are provisioned. The following security rules from the security groups are required to remove as they are deployed by default by Ingress Controller deployment in Kubernetes cluster.
Refer to the following security groups to identify the rule and remove it.
Go to EC2/VPC services section in the AWS console
Go to Security Group section
Look for the security group as mentioned in the above table

Open the security group and look for the rule related to ICMP set with source 0.0.0.0/0 and remove it. The below screenshot is a reference. Please remove only this rule only.

Remove this rule from both (two) security groups as mentioned the table above.
2.9.4. Confirm email id subscription confirmation
During the resource provisioning list of email ids included for SNS notification subscription
The infra provisioning would have subscribed these list of email ids to the SNS topics
The subscription process involves SES emailing subscription confirm/verify emails to individual email Ids
Each email account owners required to verify them before SNS could start sending notifications
2.9.5. Review and collect AWS resources details required:
Collect AWS resource information based on the infra provisioned as it is required in next pipeline jobs
account number it not noted previously
aws region
application EKS cluster name
blockchain EKS cluster name
vault secret name (refer to secret manager)
<orgname>-<env>-gitactions-admin credentials
<orgname>-<env>-openidl-apps-user credentials
<orgname>-<env>-baf-user credentials
<orgname>-<env>-baf-automation role ARN which will be assumed by *-baf-user
10. <orgname>-<env>-gitactions-admin role ARN which will be assumed by *-gitactions-admin user 11.<orgname>-<env>-openidl-apps role ARN which will be assumed by *-openidl-apps-user 12. cognito pool id 13. cognito app client id 14. s3 buckets created for HDS and IDM-ETL functions
In case anything missed to list here, while setting up the environment let us identify and include.
2.10. Deploy Blockchain Network
The next phase is blockchain deployment phase in which the following steps are required to perform.
Prepare config file for blockchain network setup
Update OpenIDL related credentials in Ansible
Deploy vault
Deploy Blockchain Network (new network or add a node to existing network)
2.10.1. Preparing Config file for Blockchain network setup
Prepare config file for blockchain network setup
Since the first step of provisioning base AWS infrastructure is completed, the next step would be preparing the dependent components and setting up either blockchain network/a node to join the existing network depends on your organization role.
The template and example configuration files are in the repository “openidl-aais-gitops” under “awx-automation/config-references”. Using these templates, the actual config file can be created and placed in the path “awx-automation/config”. The file name should follow the naming standard as below.
FileName format: <org-name>-config-<env>.yml
Org-name: Up to first 4 characters of the org name Env: dev | test | prod
The configuration file should be placed in the path “awx-automation/config/<org-name>-config-<env>.yml
NOTE: Make sure to atleast have a defaultchannel listed under channels in organization configuration file. New channel information may be added when required in the configuration file and maintained in the repository.
Please ensure that this configuration file is prepared and exist in the mentioned directory path in the github repository before triggering deployment jobs in Jenkins.
NOTE: The details in preparing the config file are to refer from the repository templates.

After preparing the configuration file as mentioned above and ensure that it is pushed to the github repository “**openidl-aais-gitops” used to prepare the node.
The following table details the meaningful description for the configuration file variables and their expected values.
AAIS |
||
|---|---|---|
Variable |
Description |
Example Value |
GITOPS_REPO_URL |
github repo url of openidl-aais-gitops repo |
|
This is the forked repo. |
||
GITOPS_REPO_BRANCH |
github branch in openidl-aais-gitops repo |
develop |
The branch where saving the file <node_type>_<env> |
||
ORDERERORG_DOMAIN_NAME |
Domain name of the ordering service running in AAIS account |
aais.aaisdirect.com |
<domain_name> |
||
This is common across all and should be the same for every carrier |
||
DOMAIN_NAME |
Domain name to be used for fabric endpoints |
aais.aaisdirect.com |
<subdomain>.<domain_name> |
||
INTERNAL_DOMAIN_NAME |
Internal domain name from the Route53 private hosted zone |
aais.internal.aaisdirect.org |
<subdomain>.internal.<domain_name> |
||
ENV |
Environment |
dev |
AAIS_ORGNAME |
AAIS organization name |
aais |
ANALYTICS_ORGNAME |
Analytics organization name |
analytics |
ANALYTICS_DOMAIN_NAME |
Analytics domain name to be used for its endpoints |
analytics.openidldirect.org |
CARRIER_ORGNAME |
Carrier organization name |
ins (should be four or less characters) |
CARRIER_DOMAIN_NAME |
Carrier domain name to be used for its endpoints |
ins.openidldirect.org |
ANAYTICS_AAIS_CHANNEL_NAME |
Channel name between Analytics and AAIS nodes |
anal-aais |
ANAYTICS_CARRIER_CHANNEL_NAME |
Channel name between Analytics and Carrier nodes |
anal-ins |
CHAINCODE_REPO_BRANCH |
Branch to be used for installing chaincode from github.com/openidl-org/openidl-main repository |
develop |
Analytics |
||
|---|---|---|
Variable |
Description |
Example Value |
GITOPS_REPO_URL |
github repo url of openidl-aais-gitops repo |
|
GITOPS_REPO_BRANCH |
github branch in openidl-aais-gitops repo |
develop |
ORDERERORG_DOMAIN_NAME |
Domain name of the ordering service running in AAIS account |
aais.openidldirect.org |
DOMAIN_NAME |
Domain name to be used for fabric endpoints |
analytics.openidldirect.org |
INTERNAL_DOMAIN_NAME |
Internal domain name from the Route53 private hosted zone |
analytics.internal.openidldirect.org |
ENV |
Environment |
dev |
AAIS_ORGNAME |
AAIS organization name |
aais |
ANALYTICS_ORGNAME |
Analytics organization name |
analytics |
ANALYTICS_DOMAIN_NAME |
Analytics domain name to be used for its endpoints |
analytics.openidldirect.org |
CARRIER_ORGNAME |
Carrier organization name |
trv |
CARRIER_DOMAIN_NAME |
Carrier domain name to be used for its endpoints |
trv.openidldirect.org |
ANAYTICS_AAIS_CHANNEL_NAME |
Channel name between Analytics and AAIS nodes |
analytics-aais |
ANAYTICS_CARRIER_CHANNEL_NAME |
Channel name between Analytics and Carrier nodes |
analytics-trv |
CHAINCODE_REPO_BRANCH |
Branch to be used for installing chaincode from github.com/openidl-org/openidl-main repository |
develop |
Carrier |
||
|---|---|---|
Variable |
Description |
Example Value |
BAF_IMAGE_REPO |
the org and repo name of the baf_image |
use this value unless otherwise stated openidl-org/openidl-aais-gitops |
GITOPS_REPO_URL |
github repo url of openidl-aais-gitops repo |
|
GITOPS_REPO_BRANCH |
github branch in openidl-aais-gitops repo |
baf-automation |
ORDERERORG_DOMAIN_NAME |
Domain name of the ordering service running in AAIS account. |
aais.openidldirect.org |
This was defined on the aais node and should be repeated here. |
||
DOMAIN_NAME |
Domain name to be used for fabric endpoints |
trv.openidldirect.org |
INTERNAL_DOMAIN_NAME |
Internal domain name from the Route53 private hosted zone |
trv.internal.openidldirect.org |
ENV |
Environment |
dev |
AAIS_ORGNAME |
AAIS organization name |
aais |
ANALYTICS_ORGNAME |
Analytics organization name |
analytics |
ANALYTICS_DOMAIN_NAME |
Analytics domain name to be used for its endpoints |
analytics.openidldirect.org |
CARRIER_ORGNAME |
Carrier organization name |
trv |
CARRIER_DOMAIN_NAME |
Carrier domain name to be used for its endpoints |
trv.openidldirect.org |
ANAYTICS_AAIS_CHANNEL_NAME |
Channel name between Analytics and AAIS nodes |
analytics-aais |
ANAYTICS_CARRIER_CHANNEL_NAME |
Channel name between Analytics and Carrier nodes |
analytics-trv |
CHAINCODE_REPO_BRANCH |
Branch to be used for installing chaincode from github.com/openidl-org/openidl-main repository |
develop |
2.10.2. Update openIDL related credentials in Ansible
Update OpenIDL relevant credentials in Ansible Tower/AWX
The next step is critical, as if you remember while setting Ansible Tower/AWX there was a step to create credentials. However the credentials setup was not completed 100% as there were unknown values for certain fields during preparation phase, hence kept dummy values to create them.
Now that the base infrastructure is created, all the values would be available now to update the credentials to be 100% ready for our pipeline jobs run smoothly without issues.
Refer to section Prepare Ansible Tower/AWX => Credentials and update the following credential type
OpenIDL-IAC specific
OpenIDL-APP specific
openIDL-IAC-AWSUser-BAF
2.10.3. Vault Deployment
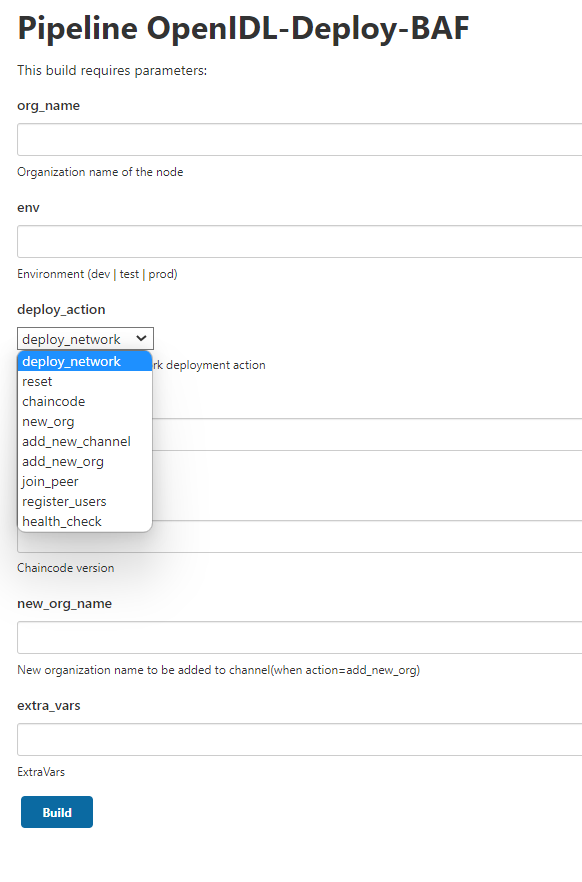
It is all set to deploy vault. Go to Jenkins and to the vault deployment pipeline job created in previous step. Click on build with parameters and key in organization name (name that was used to setup infra) and environment type (dev | test | prod) and chose deploy_action whether to deploy. There is also a vault_cleanup job which would be handy in case to remove vault for unforeseen reasons.
First run after configuring the job is dummy run as the option
shows as “Build Now”. This will fail and will update your job with
relevant parameters required for the job to run. Further runs will show
an option Build with Parameters which will be right run.

2.10.3.1. Verify Vault
Setup AWS CLI
Set AWS_PROFILE to the credentials that has access to EKS blockchain cluster
Set cluster context as blockchain cluster
Review vault objects and its working, refer to below screen shot.


This should allow access to the vault UI
2.10.4. Deploy Blockchain Network
It is time to deploy either blockchain network (new network) or joining a node to existing network.
To run blockchain related tasks, the relevant jenkins pipeline job for blockchain should be triggered with different actions based on workflow.
First run after configuring the job is dummy run as the option
shows as “Build Now”. This will fail and will update your job with
relevant parameters required for the job to run. Further runs will show
an option Build with Parameters which will be right run.
Before triggering the blockchain pipeline, let us understand the workflow involved and multiple actions that needs to be followed in sequence. Then it would be easy to follow the workflow table and trigger the blockchain pipeline job in jenkins accordingly.
2.10.4.1. AAIS node setup
The below are the steps required to complete using relevant jenkins jobs to setup base AAIS (multi tenant node). These steps are to be performed on AAIS (multi tenant node).
AAIS Node Steps |
|||||||||
|---|---|---|---|---|---|---|---|---|---|
# |
Node |
Action |
ORG |
ENV |
Channel Name |
Extra |
New Org Name |
Chaincode Version |
Comments |
1 |
AAIS |
baf_image |
aais |
dev |
Not applicable as images are already provisioned |
||||
2 |
AAIS |
vault |
aais |
dev |
defaultchannel |
||||
3 |
AAIS |
deploy_network |
aais |
dev |
defaultchannel |
||||
4 |
AAIS |
chaincode |
aais |
dev |
defaultchannel |
Format:MMDDTTTT |
|||
5 |
AAIS |
register_users |
aais |
dev |
defaultchannel |
||||
2.10.4.2. Analytics node setup
2.10.4.3. Pictorial representation

2.10.4.4. Analytics node workflow
The below are the steps to follow in deploying analytics node and joining with AAIS(multi tenant node). The procedure involves performing joint action working with AAIS(multi tenant) node.
These steps are required to perform in sequential order. These steps are to be performed through blockchain pipeline job in jenkins.

2.10.4.5. Carrier node setup
2.10.4.6. Pictorial representation

2.10.4.7. Carrier node workflow
The below are the steps to follow in deploying carrier node and joining with AAIS(multi tenant node)/Analytics node. The procedure involves performing joint action working with AAIS(multi tenant) node and Analytics node.
These steps are required to perform in sequential order. These steps are to be performed through blockchain pipeline job in jenkins.

2.10.5. How to verify blockchain actions are successful
Using kubectl client get into blockchain cluster to run kubectl commands to verify and below screenshot self explains the details.
2.10.5.1. deploy network action on AAIS node

2.10.5.2. deploy new org action on other nodes

2.10.5.3. deploy chaincode action
Verify chaincode install

Verify chaincode approve

Verify chaincode commit

Verify chaincode invoke

2.10.5.4. deploy add new channel action

2.10.5.5. deploy join peer action
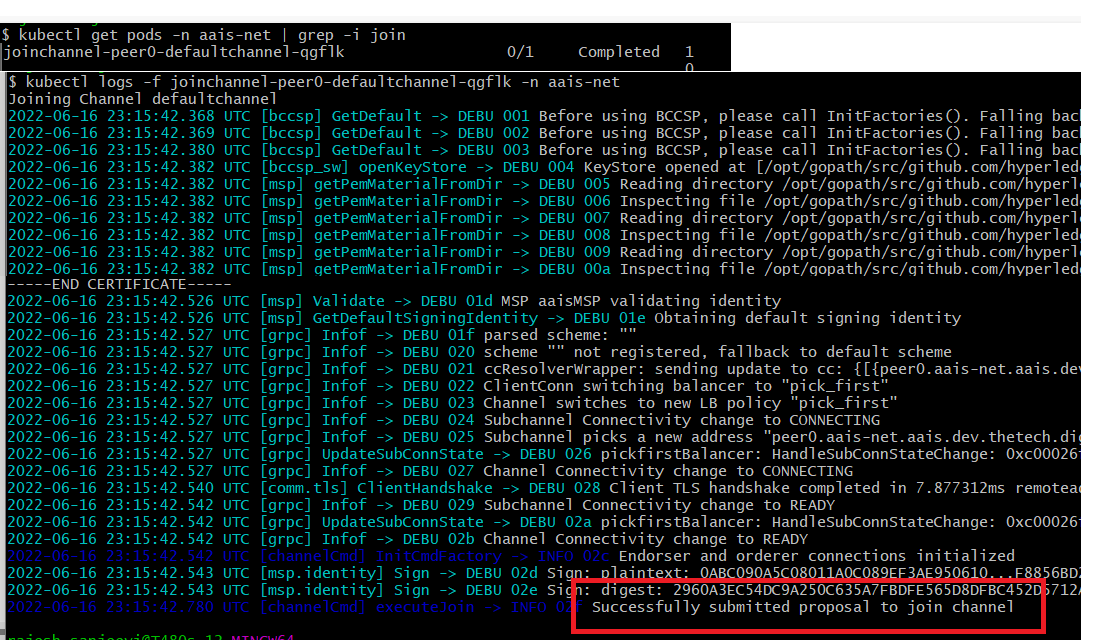
2.10.5.6. deploy register users action
2.11. Manage OpenIDL Infrastructure Resources
This section describes the operational procedures to manage OpenIDL project infrastructure resources.
2.12. Managing AWS resources
This section describes the details on how to manage AWS resources provisioned. All the resources provisioned in AWS by terraform automation has access only to the IAM role used to provision resources.
Hence to manage the resources the IAM role needs to be assumed.
1. Just to recollect during the initial preparation phase an IAM user called “terraform” and IAM role called “tf_automation” with necessary permissions was configured
Further this IAM user assumed IAM role to provision AWS resources through CI-CD pipeline
By default all the resources are accessible by the IAM role “tf_automation. Hence assuming this role helps to gain access to these resources
4. However only for the IAM role “terraform” is allowed to assume this “tf_automation”. Hence login as terraform user and assume this IAM role to manage it.
Since this terraform user is configured only with programmatic access, it is required to use AWS CLI to manage resources
2.12.1. Using AWS CLI and assuming role
Install AWS CLI (refer to AWS documentation to install AWS CLI)
Go to the user profile directory under “./aws” directory
Edit the file called “credentials” located under user profile directory “./aws/”
Update terraform user access/secret keys and assume role profile configuration as below
[openidl-terraform-user] aws_access_key_id = <accesskey> aws_secret_access_key = <secretkey> [openidl-terraform-role] role_arn = <IAM-ROLE-ARN> source_profile = openidl-terraform-user external_id = terraform region = <aws-region> |
Once this profile is updated in the “credentials” file save and close
Go to command line interface and set the AWS_PROFILE=openidl-terraform-role
Linux: export AWS_PROFILE=openidl-terraform-role Windows: set AWS_PROFILE=openidl-terraform-role
Validate the profile is configured well and IAM user is able to assume the role by running this command.
#aws sts get-caller-identity
} |
Now it is all set to manage AWS resources through CLI
2.13. Managing EKS Kubernetes Cluster and resources
This section briefs the details about access to EKS kubernetes cluster and how to manage it.
Let us first understand how this access to EKS cluster is all set in AWS. Whenever a kubernetes cluster is created in AWS the IAM user or IAM role assumed by the user gains access to EKS cluster by default. Other than this IAM user/role none of them will have access to the cluster.
However in our project during AWS resource provisioning, there is an option to enter list of IAM users/IAM roles to provision access to EKS cluster part of deployment and its configuration. In case if you have added some IAM user/IAM role they would have gained access.
Finally the last option is that part of our project there is a default IAM role which is set to have access to the EKS cluster. However to assume this IAM role manage EKS cluster, an IAM user must the added to the specific IAM group setup part of resource provisioning. Once the user is added in the group then the user has permissions to assume this IAM role to manage EKS cluster.
In summary who has access to EKS cluster
tf_automation role and it can be assumed by terraform user
List of IAM users/IAM roles allowed permissions to the EKS cluster part of AWS resource provisioning pipeline process
3. Letting list of IAM users by subscribing to IAM group specifically setup for this purpose and the user assumes the IAM role allowed to assume by this group membership
In all of these cases setting up AWS CLI and configuring IAM role assumption in AWS profiles helps to gain access to EKS cluster.
In case how to setup AWS CLI profile, refer to section “Managing AWS resources”
2.13.1. Adding IAM user to IAM group for managing EKS
Login to AWS and got IAM and under groups
Edit the group <orgname>-<env>-eks-admin. Example aais-dev-eks-admin
Add any IAM user expected to give permissions to EKS cluster
Now the user has permission to assume the IAM role named “<orgname>-<env>-eks-admin” to gain eks cluster access.
Example IAM ROLE ARN: arn:aws:iam::<acc_number>:role/carr-dev-eks-admin
2.13.2. Managing EKS Kubernetes Cluster
Setup AWS CLI (refer to AWS documentation)
Setup AWS Profile (refer to section managing aws resources)
set/export AWS_PROFILE
set cluster context to whichever cluster the user is going to manage
#aws eks update-kubeconfig –region <region> –name <orgname>-<env>-<clustername>
Example: aws eks update-kubeconfig –region us-east-2 –name aais-dev-blk-cluster
2.14. Connecting to Vault Cluster
This section describes how to connect to vault cluster and further retrieve following certificates.
#Orderer TLS certificate from AAIS node (multi tenant) hashicorp vault
#Analytics/Carrier ORG MSP from hashicorp vault
2.14.1. Connecting to vault cluster
Setup AWS CLI profile with necessary credentials and IAM role
Switch to the K8s blockchain cluster context
Example: #>aws eks update-kubeconfig –region <region> –name <blockchain-cluster-name>
Get the vault root token from AWS secret manager to login vault
Example: #>aws secretsmanager get-secret-value –region <region> –secret-id <orgname>-<env>-vault-unseal-key
** Ensure that the AWS credentials has permissions to retrieve secret from secrets manager
Setup port-forward using below command to access vault
#kubectl port-forward -n vault svc/vault 8200:8200
Login to vault using root token retrieved from AWS secret manager
2.14.2. Retrieve Orderer TLS certificate (AAIS Node)
Orderer TLS certificate is available at the below mentioned path. Replace <orgname> with organization name (aais)
Path: http://localhost:8200/ui/vault/secrets/<orgname=aais?>/show/crypto/peerOrganizations/<orgname>-net/orderer/tls
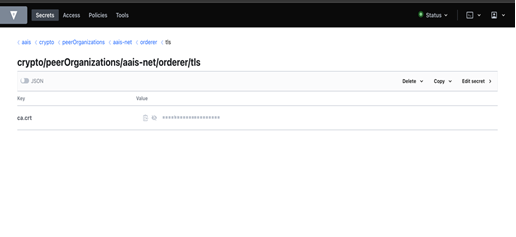
Copy the orderer TLS certificate and paste into a file, Example: “orderer.pem”
Convert the orderer TLS certificate to base64
#cat “orderer.pem” | base64
Share the base64 encoded orderer TLS certificate with analytics/carrier node. This would be used during blockchain network steps
2.14.3. Retrieve Org MSP certificate (Analytics or Carrier Node)
Org MSP certificate is available at the below mentioned path. Replace <orgname> with organization name (anal | trv |etc for example)
Path: http://localhost:8200/ui/vault/secrets/<orgname>/show/crypto/peerOrganizations/<orgname>-net/mspDefinition

Copy the Org MSP certificate and paste into a file, Example: “orgMSP.txt”
3. Share the Org MSP certificate AS-IS copied from the vault to AAIS node owner to add them in their environment as secrets. This would be used during blockchain network steps
2.15. Connecting to AWS Secrets Manager
This section describes how to connect to AWS secrets manager to retrieve/write secrets like
#Orderer TLS certificate on Analytics or Carrier node
#Org MSP of analytics or carrier node on AAIS node
2.15.1. Storing Orderer TLS certificate on Analytics/Carrier Node
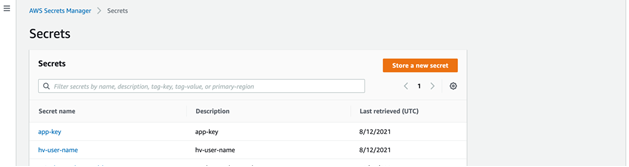
Login to AWS console and go to secrets manager
Click on store new secret
Select “Other type of secrets” and use “Plaintext”
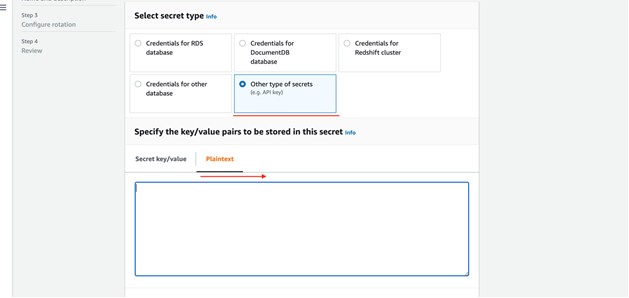
Set a name to the secret as “<env>-orderer-tls”. Example: dev-orderer-tls

Disable automatic rotation and complete creating the secret
2.15.2. Storing Org MSP certificate on AAIS node
Login to AWS console and go to secrets manager
Click on store new secret
Select “Other type of secrets” and use “Plaintext”
Set a name to the secret as “<env>-<orgname>-msp”. Example: dev-analytics-msp | dev-trv-msp | dev-carrier-msp (depends on orgname used)
Disable automatic rotation and complete creating the secret
2.16. Managing MongoDB
The below are the steps to perform to manage MongoDB instance.
Setup AWS CLI and set AWS_PROFILE to the relevant IAM credentials that has access to EKS application cluster
- Set the context to application cluster
Example: aws eks update-kubeconfig –region <region> –name <app-cluster-name>
Set port forward using below command
#kubectl port-forward -n database svc/${ORG-NAME}-mongodb-headless 27017:27017
org-name refers to organisation name set during node preparation (AWS resources/blockchain)
If you are running mongodb locally, you should use another port like 28017:27017 in port-forward command
Connect to MongoDB using Compass client with following URL
# mongodb://${MONGODB_USERNAME}:${MONGODB_PASSWORD}@localhost:27017 /openidl-offchain-db?authSource=openidl-offchain-db
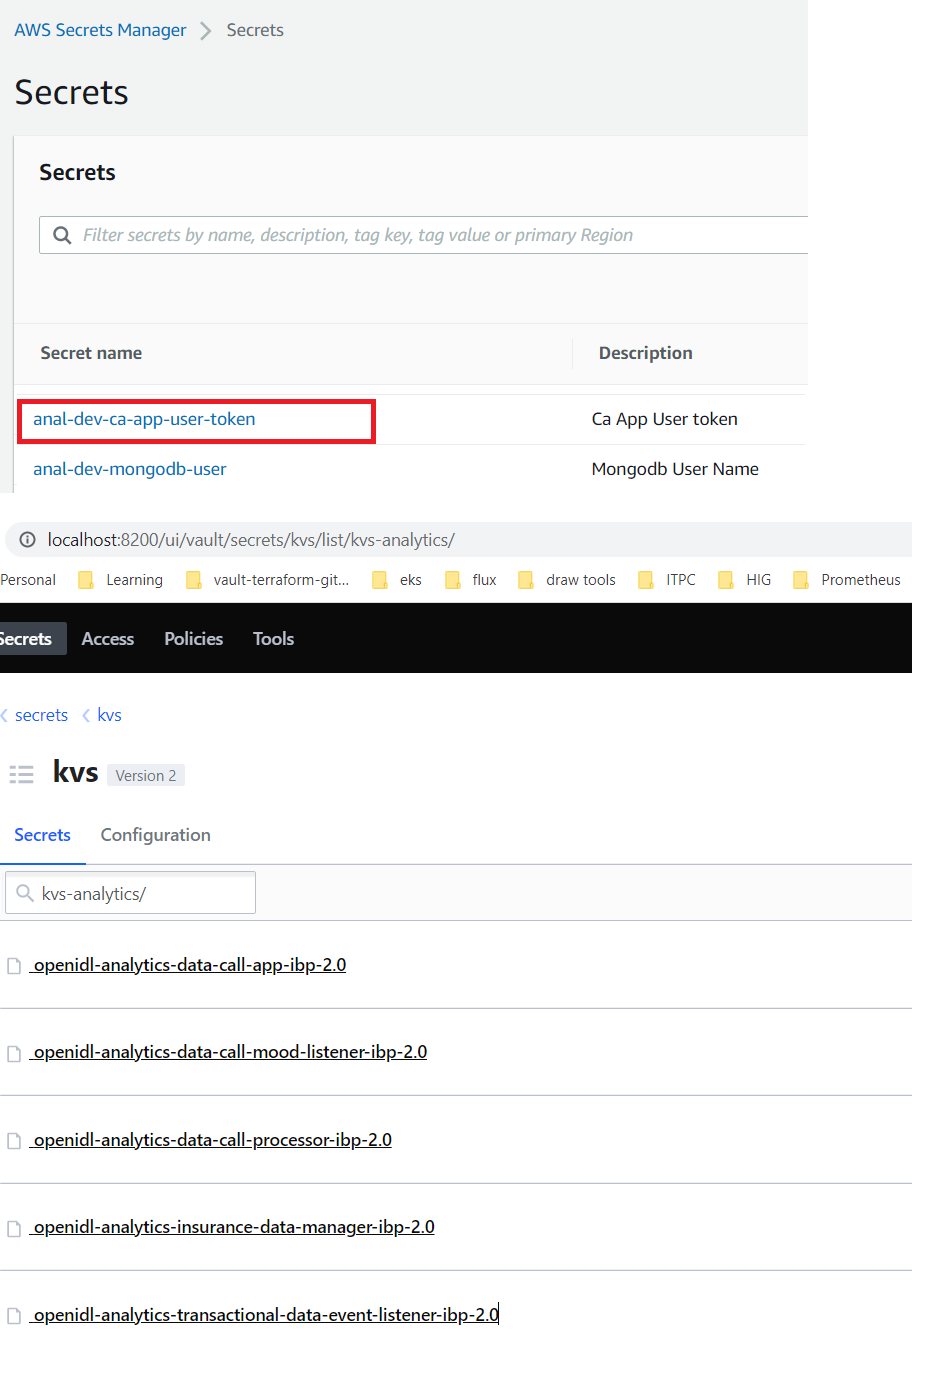
The mongodb_username and mongodb_password are put into the aws secrets manager at
<org_name>-<env>-mongodb-user for the username and <org_name>-<env>-mongodb-user-token for the password
use “tf_automation” role to access the tokens as they have rights to read the credentials.
Command to retrieve secrets
#aws secretsmanager get-secret-value –region <region> –secret-id <orgname>-<env>-mongodb-user #aws secretsmanager get-secret-value –region <region> –secret-id <orgname>-<env>-mongodb-user-token
2.17. Deploy OpenIDL Application
This section briefs the procedure to deploy backend database mongodb, application APIs and configuration steps to bring the OpenIDL platform up and running for use.
The below are the steps involved
Deploy MongoDB
Prepare application API configuration files
Add application API configuration files to vault
Deploy API configuration files as secrets object in EKS cluster
Deploy application APIs as deployment objects in EKS cluster
Create admin user in AWS Cognito
Create application users using Utilities Service API
2.17.1. Deploy MongoDB
deploy mongodb instance
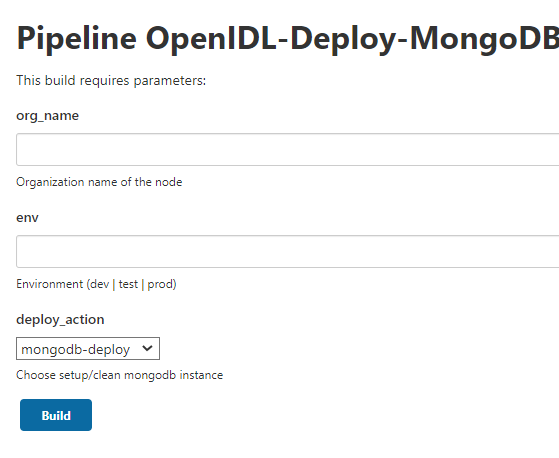
Go to Jenkins and click on relevant MongoDB job
Click on Build with parameters and key in organization name and environment type
Choose deploy_action as “mongodb-deploy”
Note: First run after configuring the job is dummy run as the option shows as “Build Now”. This will fail and will update your job with relevant parameters required for the job to run. Further runs will show an option Build with Parameters which will be right run.
In case mongodb deployment ran to issues, bug fix the issues and perform mongodb_cleaup before rerun deployment.
The deploy_action “mongodb_cleanup” helps in Jenkins job to perform cleanup.
2.17.2. Preparing application API configuration files
preparing application config json files
Get to the repository openidl-aais-gitops and to the directory “openidl-config/”
This has config-templates directory under which the set of template files are available individually for each node type (aais | analytics | carrier)
Update the relevant set of template config files with all correct values
Run #make copy_config_files to generate correct config files in to the config directory
Refer to below table that describes the details of each field and the value expected from the environment provisioned
Variable |
Description |
Example |
|---|---|---|
AAIS_ORGNAME |
Organization name used in setting up infra/blockchain network |
aais |
AAIS_ORGNAME_SHORT |
Organization short name used by automation in setting up resources (first 4 chars) |
aais |
ANALYTICS_ORGNAME |
Organization name used in setting up infra/blockchain network |
analytics |
ANALYTICS_ORGNAME_SHORT |
Organization short name used by automation (first 4 chars) |
anal |
CARRIER_ORGNAME |
Organization name used in setting up infra/blockchain network |
travelers or hig or cnd |
CARRIER_ORGNAME_SHORT |
Organization short name used by automation (upto first 4 chars) |
trav or hig or cnd |
ENV |
environment name dev or test or prod |
dev |
DOMAIN |
DNS domain name set |
thetech.digital |
SUBDOMAIN |
DNS sub domain if used (optional: otherwise remove this) |
openidl |
TLS_CERT |
Refer to section CREATING CA TLS CERT for connection profile |
go to particular section to understand |
AWS_COGNITO_ACCESS_KEY_ID |
AWS access key of application user provisioned by terraform |
refer to IAM |
AWS_COGNITO_SECRET_ACCESS_KEY |
AWS secret key of application user provisioned by terraform |
refer to IAM |
AWS_COGNITO_REGION |
AWS region |
us-east-2 |
AWS_COGNITO_USERPOOLID |
Cognito userpool ID |
refer to cognito to identify the ID |
AWS_COGNITO_CLIENTID |
Cognito application client ID |
refer to cognito to identify application ID |
AWS_COGNITO_REGION |
AWS region |
us-east-2 |
MONGO_DB_USERNAME |
Get the username from AWS secrets manager <orgname>-<dev>-mongodb-user |
aais-dev-mongodb-user |
MONGO_DB_PASSWORD |
Get the password from AWS secrets manager <orgname>-<dev>-mongodb-user-token |
aais-dev-mongodb-user-token |
AWS_SECRET_MANAGER_ACCESS_KEY_ID |
AWS access key of application user provisioned by terraform |
refer to IAM |
AWS_SECRET_MANAGER_SECRET_ACCESS_KEY |
AWS secret key of application user provisioned by terraform |
refer to IAM |
AWS_SECRET_MANAGER_REGION |
aws region |
us-east-2 |
VAULT_SECRET_NAME |
Name of the secret that gets the valut secret for application <orgname>-<dev>-kvs-vault |
aais-dev-kvs-vault |
AWS_S3_ACCESS_KEY_ID |
AWS access key of application user provisioned by terraform |
refer to IAM |
AWS_S3_SECRET_ACCESS_KEY |
AWS secret key of application user provisioned by terraform |
refer to IAM |
AWS_S3_REGION |
aws region |
us-east-2 |
S3_BUCKET_NAME |
Name of the S3 bucket provisioned for HDS datastore |
refer to S3 |
S3_BUCKET_NAME_LOGOS |
Name of S3 bucket provisioned for icons |
refer to S3 |
2.17.2.1. Retrieving CA TLS Certificate
Go to command line
Set AWS_PROFILE to the relevant profile that has access to vault root token secret in AWS secret manager
#set AWS_PROFILE=tf-automation-role (or)
#export AWS_PROFILE=tf-automation-role
Retrieve vault root token from AWS secret manager
#aws secretsmanager get-secret-value –region <region> –secret-id <orgname>-<env>-vault-unseal-key
#example: aws secretsmanager get-secret-value –region us-east-2 –secret-id aais-dev-vault-unseal-key
Now set the AWS_PROFILE to the relevant profile that has access to blockchain EKS cluster
#set AWS_PROFILE=eks-admin-role (or)
#export AWS_PROFILE=eks-admin-role
IAM user or assume IAM role that has access to the EKS cluster
Set the cluster context to blockchain cluster
#aws eks update-kubeconfig –region <region> –name <blockchain-cluster-name>
Perform port-forward for vault service
#kubectl port-forward -n vault svc/vault 8200:8200
Vault should be available at http://localhost:8200
Login to vault using root token retrieved from AWS secrets manager
The CA TLS certificate should be available at below path. Replace <orgname> with actual orgnaization name
PATH: http://localhost:8200/ui/vault/secrets/<orgname>/show/crypto/peerOrganizations/<orgname>-net/ca
Name of the key to retrieve value from “ca.<orgname>-net-cert.pem”
Example: ca.aais-net-cert.pem
Now copy this CA TLS certificate pem content into editor like “VS CODE”
Use replace all values, select use regular expressions (title ‘.*’ icon on search) and replace “n” with “\n”

After replacing al, final output would look like below.
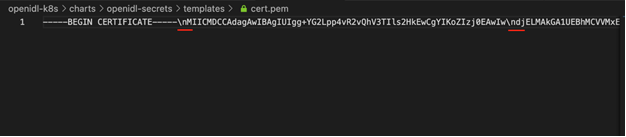
2.17.3. Add application API configuration files to vault
Add application configuration json files as secrets into vault
Go to command line and set AWS_PROFILE to the relevant profile that has access to EKS cluster
Set the cluster context to blockchain cluster
#aws eks update-kubeconfig –region <region> –name <blockchain-cluster-name>
3. Create a local file ubuntu.yml and paste the following content in the file (this file is available in the repository under openidl-config)
apiVersion: v1 kind: Pod metadata:
|
Create a new pod in the default namespace using the above definition
#kubectl apply -f ./ubuntu.yml
Copy the config files prepared from openidl-aais-gitops/openidl-config/config/config-<env>-<node>/ directory to the pod
#cd openidl-aais-gitops/openidl-config/
#kubectl cp config/<config-<dev>-<node-type>/ default/ubuntu:config
Example: kubectl cp config/config-dev-aais/ default/ubuntu:config
Copy add-vault-config script to the pod
#cd openidl-aais-gitops/vault-scripts
#kubectl cp add-vault-config.sh default/ubuntu:add-vault-config.sh
Exec into the pod #kubectl exec -it ubuntu - /bin/bash
Update the pod and install utilties vim, curl, dos2unix, jq
#apt-get update #apt-get install vim jq curl dos2unix -y
9. Check whether the files are copied correctly into the pod. You should see the file “add-vault-config.sh” under “/” directory and application config files under “/config” directory
Allow execute permission to add-vault-config.sh #chmod +x add-vault-config.sh
In case due to copying from windows to linux has file formatting issue, run this command #dos2unix add-vault-config.sh
Now get the vault user login credentials from AWS secret manager that has access to config files located in vault path
Get onto AWS CLI, set the AWS_PROFILE to “tf-automation-role” that has access to secrets
14 Retrieve the credential using below command.
#aws secretsmanager get-secret-value –region <region> –secret-id <orgname>-<dev>-config-vault
Example: aws secretsmanager get-secret-value –region us-east-2 –secret-id aais-dev-config-vault
Now get onto the ubuntu pod and run the add-vault-script.sh with the retrieved credentials to upload config files as secrets into vault
#./add-vault-config.sh -V <url> -U <username> -P <password> -a <vaultPath> -o <orgName> -c ./config
#All the values for the parameters are retrieved from the secret <orgname>-<dev>-config-vault
After successful upload of config files as secrets in vault, delete the pod safely
#kubectl delete pod ubuntu -n default
2.17.4. Prepare application API deployment value files
Prepare application api deployment value files
Go to openidl-aais-gitops/openidl-k8s directory
Update the deployment definition file according the node type (aais | analytics | carrier)
#gloabl-values-dev-<node-type>.yaml
Examples:
global-values-dev-aais.yaml
global-values-dev-analytics.yaml
global-values-dev-carrier.yaml
Once the relevant file is prepared for the node, push it to github repository before executing deployment pipeline job
Work with AAIS in updating this file as they have most of the information especially image repository, image and tags.
However the below table describes brief information that benefits to some extend.
Key Field |Description |
image.tag | Get the image tag from AAIS |
2.17.5. Deploy Deploy application APIs and its secrets
deploy secret object & application apis
First run after configuring the job is dummy run as the option shows as “Build Now”. This will fail and will update your job with relevant parameters required for the job to run. Further runs will show an option Build with Parameters which will be right run.
This step involves two actions as the APIs needs to the config files which are set as secret object. Hence deploy secrets and then APIs.
To deploy application secrets and OpenIDL application, run the job configured for OpenIDL applications. Go to Jenkins and select the relevant job and use Build with Parameters.
Perform deploy-secrets action in the pipeline to get the config files from vault to K8s as secrets
Perform deploy-apps action in the pipeline to get the openIDL apis to be deployed as deployment objects in K8s
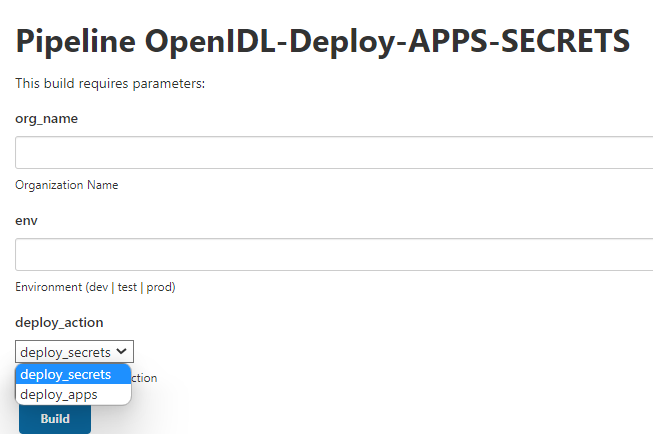
2.18. Setting up application users
creating cognito admin user and application users
After deploying application the next step is setting up the below
Creating Cognito admin user
Creating application users
2.18.1. Creating Admin user in Cognito
setting up cognito admin user
Log into AWS Console and select the Cognito User Pool. Click on ‘Users and Groups’

Select ‘Create User’ and provide the required information. See screenshot below

Once the user gets created, password will need to be changed. Go to ‘App Client Settings’ and ‘Launch Hosted UI’

Log-in using the credentials of the admin user which was just created

Change the password
note down the credentials
2.18.2. Creating application users
setting up application users for API endpoint access
Launch the Utilities Service Swagger at http://utilities-service ${ENV}.${ORGNAME}.${DOMAIN}.com/api-docs

Select ‘app-user-login’ and provide the cognito user admin credentials. Get the ‘userToken’ from response and ‘Authorize’ the user
Select ‘app-user-creation’ and provide the necessary information for creating the user. Following are the examples for creating users for different organizations
AAIS Organization |
} |
ANALYTICS Organization |
} |
CARRIER Organization |
} |